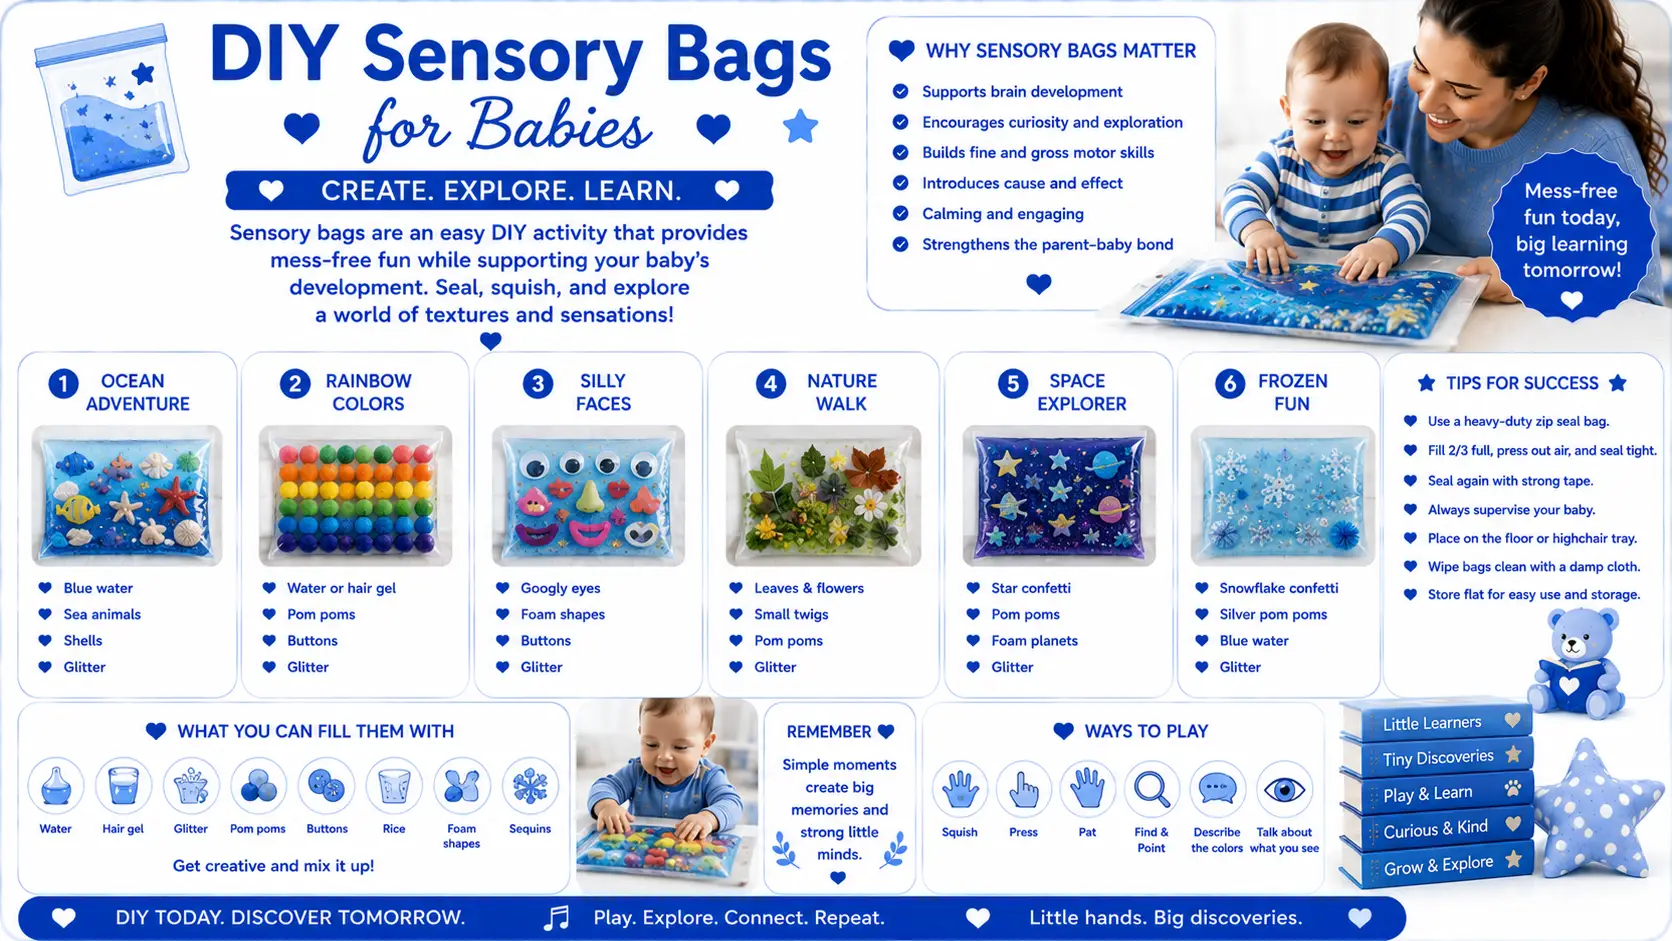

If you love the idea of sensory play but not the cleanup, DIY sensory bags are the answer. These sealed, squishy pouches let babies and toddlers press, squeeze, and explore colors and textures — all without a single grain of rice hitting the floor. They’re cheap to make, endlessly customizable, and perfect for tummy time, car rides, or a quiet activity at the high chair.
This guide covers how to make a sensory bag, the best filling ideas, and what parents ask most about this mess-free sensory play.
What Is a DIY Sensory Bag?
A sensory bag is a sealed, squishy pouch — usually a zip-top freezer bag — filled with engaging materials like gel, water, or small objects. Because it’s fully sealed, babies and toddlers can squish, press, and explore it visually and tactilely without the mess (or choking risk) of loose materials. Sensory bags are especially popular for babies who aren’t yet ready for loose-parts play, since everything stays contained.
Benefits of DIY Sensory Bags
Mess-free sensory exploration — all the visual and tactile stimulation of sensory play with none of the cleanup
Fine motor development — pressing, squishing, and tracing objects through the bag builds hand strength and coordination
Visual tracking — moving objects, colors, and glitter encourage babies to focus and follow movement with their eyes
Cause-and-effect learning — pressing on the bag and watching contents shift teaches simple cause-and-effect concepts
Safe for mouthing babies — since the bag is sealed, it’s a good sensory option for babies who put everything in their mouths (always supervise closely)
Great for tummy time — taping a sensory bag to the floor gives babies something engaging to focus on while building neck and arm strength
How to Make a Sensory Bag
Making a sensory bag takes just a few minutes:
Choose a sturdy zip-top freezer bag (quart or gallon size, depending on age)
Add your base filling — hair gel, clear shampoo, or water are the most common
Add color with a few drops of food coloring, or mix in glitter, confetti, or small toys
Squeeze out excess air and seal the bag tightly
Reinforce the seal with clear packing tape or duct tape around the edges for extra security
Tape the bag to a high chair tray, table, or floor for hands-free tummy time play
DIY Sensory Bag Filling Ideas
Classic hair gel bag Fill a bag with clear hair gel and a few drops of food coloring for a smooth, squishy base that’s easy to customize for any theme.
Ocean sensory bag Use blue hair gel with small plastic sea creatures, shells, and a pinch of glitter for an under-the-sea theme kids love pressing and searching through.
Water and oil bag Combine water, a little vegetable oil, and food coloring for a bag that shows how the two liquids separate and move — a simple introduction to density for older toddlers and preschoolers.
Pom-pom and water bag Fill a bag with water and a handful of colorful pom-poms for a lightweight, floaty sensory bag that’s gentle for younger babies.
Nature or seasonal bag Add real or silk leaves, small pinecones, or seasonal confetti to a bag with a bit of gel or water for a rotating, season-themed sensory experience.
Rice or dried grain bag Fill a bag with dry rice, dried beans, or corn kernels for a bag that offers sound and light texture shifts when squeezed — good for babies who enjoy crinkly, textured sensations.
Letter or number bag Add foam letters or numbers to a gel-filled bag, then turn it into a simple learning game by asking your toddler to find a specific letter or number.
Sensory Bag Safety Tips
Always supervise babies and toddlers during sensory bag play, even though the bag is sealed
Reinforce seams with tape to prevent leaks or tears, especially with pointed objects inside
Avoid sharp or pointed fillings that could puncture the bag
Check the bag periodically for wear, especially with older toddlers who may bite or chew on it
Keep sensory bags away from unsupervised sleep areas or cribs, since a punctured bag could pose a suffocation risk
Final Thoughts
DIY sensory bags are one of the easiest ways to bring sensory play into your home without worrying about the mess. With a zip-top bag, a little hair gel or water, and whatever small items you have on hand, you can create a new sensory experience in minutes — and reuse the same bag for weeks of squishing, pressing, and exploring.
FAQ
What age can babies start using sensory bags?
Sensory bags can be used from birth, since babies can visually track colors and movement even before they can grasp objects. More interactive squishing and pressing typically becomes engaging around 3 to 4 months and beyond.
What’s the best filling for a DIY sensory bag?
Clear hair gel or clear shampoo is the most popular base because it creates a smooth, squishy texture and holds color well. Water works too, though it moves more freely and can feel less substantial when pressed.
Are sensory bags safe for babies who put things in their mouths?
Sensory bags are a popular option for mouthing babies because the contents stay sealed inside, but they should always be supervised in case the bag tears or the seal weakens.
How long do DIY sensory bags last?
A well-sealed sensory bag can last for weeks or even months of repeated play, especially if reinforced with tape. Check regularly for leaks, tears, or worn seams and discard or reseal as needed.
Can sensory bags be reused or refilled?
Yes, many parents refill or swap out sensory bags seasonally by opening a corner, adding new items, and resealing with tape. Just make sure the bag material is still sturdy before reusing it.