
Skip to content
DidYouSearch DidYouSearch
  • did you search?
  • Baby Plus+
    • Baby Activities
      • Arts & Crafts
      • Indoor Activities
      • Montessori
      • Music
      • Outdoor Activities
      • Reading
      • Sensory Play
      • Tummy Time
    • Baby Development
      • Brain Development
      • Cognitive Development
      • Emotional Development
      • Fine Motor Skills
      • Growth Milestones
      • Monthly Milestones
      • Motor Skills
      • Physical Development
      • Social Development
      • Speech Development
    • Baby Feeding
      • Allergies
      • Baby Led Weaning
      • Bottle Feeding
      • Breast feeding
        • Breastfeeding Diet
        • Breastfeeding Positions
        • Latch Problems
        • Low Milk Supply
        • Mastitis
        • Pumping Schedule
        • Weaning
      • Burping
      • Cluster Feeding
      • Feeding Schedule
      • Formula Feeding
        • Formula Amount
        • Formula Brands
        • Formula Comparison
        • Formula Preparation
        • Formula Storage
      • Hydration
      • Pumping
      • Solid Foods
    • Baby Gear Reviews
      • Best Baby Carrier
      • Best Baby Monitor
      • Best Baby Strollers
      • Best Bottles
      • Best Breast Pump
      • Best Car Seat
      • Best Cribs
      • Best Diapers
      • Best Formula
      • Best Toys
    • Baby Growth
      • Growth Spurts
      • Height Charts
      • Monthly Growth
      • Percentiles
      • Weight Charts
    • Baby Health
      • Allergies
      • Cold
      • Constipation
      • Cough
      • Diarrhea
      • Ear Infection
      • Fever
      • Flu
      • Pediatric Visits
      • Rashes
      • Teething
      • Vaccines
      • Vomiting
    • Baby Nutrition
      • Dairy
      • Drinks
      • Eggs
      • Fish
      • Fruits
      • Healthy Recipes
      • Meat
      • Snacks
      • Vegetables
      • Vitamins
    • Baby Products
      • Baby Carriers
      • Bassinets
      • Bottles
      • Breast Pumps
      • Car Seats
      • Cribs
      • Diaper Bags
      • High Chairs
      • Monitors
      • Strollers
      • Swings
      • Toys
      • Walkers
    • Baby Recipes
      • BLW Recipes
      • Breakfast
      • Dinner
      • Finger Foods
      • Lunch
      • Purees
      • Snacks
    • Baby Safety
      • Baby Proofing
      • Car Seats
      • Choking Hazards
      • CPR
      • Home Safety
      • Poison Prevention
      • Safe Sleep
      • Sun Protection
      • Water Safety
  • Baby Names
    • Boy Names
    • Girl Names
    • American baby boy names
    • American baby girl names
    • Biblical Names
    • Middle Names
    • Modern Names
    • Short Names
    • Unique Names
    • Unisex Names
  • Recommended
    • Baby Shopping
      • Baby Registry
      • Budget Baby Shopping
      • Hospital Bag
      • Must Have Products
      • Newborn Checklist
      • Nursery Ideas
    • Baby Sleep
      • Bedtime Routine
      • Co Sleeping
      • Crib Safety
      • Nap Schedules
      • Night Wakings
      • Sleep Environment
      • Sleep Products
      • Sleep Regression
      • Sleep Training
      • Wake Windows
      • White Noise
    • Childcare
      • Daycare
      • Babysitters
      • Kindergarten
      • Nannies
      • Preschool
    • Newborn Care
      • Nail Care
      • Baby Hygiene
      • Bathing
      • Crying
      • Diapering
      • Ear Care
      • Eye Care
      • Skin Care
      • Soothing Techniques
      • Temperature
      • Umbilical Cord
    • Special Needs
      • Premature Babies
      • Autism Signs
      • Developmental Delays
      • Down Syndrome
      • NICU
      • Twins
    • Seasonal Baby Care
      • Spring
      • Summer
      • Travel
      • Fall
      • Holidays
      • Winter
  • Parenting
    • Bonding
    • Discipline
    • Emotional Intelligence
    • First Time Parents
    • Gentle Parenting
    • Positive Parenting
    • Routines
    • Single Parents
    • Working Parents
  • Pregnancy
    • Pregnancy Complications
    • Labor & Delivery
    • Postpartum Recovery
    • Pregnancy Exercises
    • Pregnancy Medications
    • Pregnancy Nutrition
    • Pregnancy Sleep
    • Pregnancy Symptoms
    • Pregnancy Tests
    • Pregnancy Vitamins
    • Pregnancy Weeks
  • Toddler
    • Preschool
    • Speech
    • Tantrums
    • Toddler Food
    • Toddler Sleep
    • Behavior
    • Independence
    • Learning
    • Potty Training
  • Traveling with Baby
    • Road Trips
    • Beach
    • Camping
    • Flying
    • Hotels
    • Packing Lists
  • did you search?
  • Baby Plus+
    • Baby Activities
      • Arts & Crafts
      • Indoor Activities
      • Montessori
      • Music
      • Outdoor Activities
      • Reading
      • Sensory Play
      • Tummy Time
    • Baby Development
      • Brain Development
      • Cognitive Development
      • Emotional Development
      • Fine Motor Skills
      • Growth Milestones
      • Monthly Milestones
      • Motor Skills
      • Physical Development
      • Social Development
      • Speech Development
    • Baby Feeding
      • Allergies
      • Baby Led Weaning
      • Bottle Feeding
      • Breast feeding
        • Breastfeeding Diet
        • Breastfeeding Positions
        • Latch Problems
        • Low Milk Supply
        • Mastitis
        • Pumping Schedule
        • Weaning
      • Burping
      • Cluster Feeding
      • Feeding Schedule
      • Formula Feeding
        • Formula Amount
        • Formula Brands
        • Formula Comparison
        • Formula Preparation
        • Formula Storage
      • Hydration
      • Pumping
      • Solid Foods
    • Baby Gear Reviews
      • Best Baby Carrier
      • Best Baby Monitor
      • Best Baby Strollers
      • Best Bottles
      • Best Breast Pump
      • Best Car Seat
      • Best Cribs
      • Best Diapers
      • Best Formula
      • Best Toys
    • Baby Growth
      • Growth Spurts
      • Height Charts
      • Monthly Growth
      • Percentiles
      • Weight Charts
    • Baby Health
      • Allergies
      • Cold
      • Constipation
      • Cough
      • Diarrhea
      • Ear Infection
      • Fever
      • Flu
      • Pediatric Visits
      • Rashes
      • Teething
      • Vaccines
      • Vomiting
    • Baby Nutrition
      • Dairy
      • Drinks
      • Eggs
      • Fish
      • Fruits
      • Healthy Recipes
      • Meat
      • Snacks
      • Vegetables
      • Vitamins
    • Baby Products
      • Baby Carriers
      • Bassinets
      • Bottles
      • Breast Pumps
      • Car Seats
      • Cribs
      • Diaper Bags
      • High Chairs
      • Monitors
      • Strollers
      • Swings
      • Toys
      • Walkers
    • Baby Recipes
      • BLW Recipes
      • Breakfast
      • Dinner
      • Finger Foods
      • Lunch
      • Purees
      • Snacks
    • Baby Safety
      • Baby Proofing
      • Car Seats
      • Choking Hazards
      • CPR
      • Home Safety
      • Poison Prevention
      • Safe Sleep
      • Sun Protection
      • Water Safety
  • Baby Names
    • Boy Names
    • Girl Names
    • American baby boy names
    • American baby girl names
    • Biblical Names
    • Middle Names
    • Modern Names
    • Short Names
    • Unique Names
    • Unisex Names
  • Recommended
    • Baby Shopping
      • Baby Registry
      • Budget Baby Shopping
      • Hospital Bag
      • Must Have Products
      • Newborn Checklist
      • Nursery Ideas
    • Baby Sleep
      • Bedtime Routine
      • Co Sleeping
      • Crib Safety
      • Nap Schedules
      • Night Wakings
      • Sleep Environment
      • Sleep Products
      • Sleep Regression
      • Sleep Training
      • Wake Windows
      • White Noise
    • Childcare
      • Daycare
      • Babysitters
      • Kindergarten
      • Nannies
      • Preschool
    • Newborn Care
      • Nail Care
      • Baby Hygiene
      • Bathing
      • Crying
      • Diapering
      • Ear Care
      • Eye Care
      • Skin Care
      • Soothing Techniques
      • Temperature
      • Umbilical Cord
    • Special Needs
      • Premature Babies
      • Autism Signs
      • Developmental Delays
      • Down Syndrome
      • NICU
      • Twins
    • Seasonal Baby Care
      • Spring
      • Summer
      • Travel
      • Fall
      • Holidays
      • Winter
  • Parenting
    • Bonding
    • Discipline
    • Emotional Intelligence
    • First Time Parents
    • Gentle Parenting
    • Positive Parenting
    • Routines
    • Single Parents
    • Working Parents
  • Pregnancy
    • Pregnancy Complications
    • Labor & Delivery
    • Postpartum Recovery
    • Pregnancy Exercises
    • Pregnancy Medications
    • Pregnancy Nutrition
    • Pregnancy Sleep
    • Pregnancy Symptoms
    • Pregnancy Tests
    • Pregnancy Vitamins
    • Pregnancy Weeks
  • Toddler
    • Preschool
    • Speech
    • Tantrums
    • Toddler Food
    • Toddler Sleep
    • Behavior
    • Independence
    • Learning
    • Potty Training
  • Traveling with Baby
    • Road Trips
    • Beach
    • Camping
    • Flying
    • Hotels
    • Packing Lists
Close

Search

Home/Baby Safety/How to Install a Car Seat Correctly: Step-by-Step Guide
Baby SafetyCar Seats

How to Install a Car Seat Correctly: Step-by-Step Guide

By Ali
August 3, 2026 12 Min Read
0

Installing a car seat correctly is one of the most important things you can do to protect your child in the vehicle. But even a high-quality car seat cannot provide its intended protection if it is installed incorrectly or if the harness does not fit your child properly.

The good news is that safe installation doesn’t have to be complicated. The key is to follow the instructions for both your car seat and your vehicle, use the correct installation method, and check the fit every time your child rides.

In this guide, we’ll walk through how to install a car seat correctly step by step, including rear-facing and forward-facing installation, seat belts versus lower anchors, tether use, recline angle, harness adjustment, and the final safety checks you should perform before driving.

Important: This guide provides general installation information. Your specific car seat and vehicle may have different requirements. Always follow the manufacturer’s instructions for your exact model.

Quick Answer: How Do You Install a Car Seat Correctly?

Contents hide
1 Quick Answer: How Do You Install a Car Seat Correctly?
2 Step 1: Make Sure You Have the Right Car Seat
3 Step 2: Read Both Manuals Before Installing
3.1 Don’t rely on memory
4 Step 3: Choose the Correct Seating Position
5 Step 4: Choose Seat Belt or Lower Anchors
5.1 Option 1: Vehicle Seat Belt
5.2 Option 2: Lower Anchors
6 Step 5: Locate the Correct Installation Points
6.1 Lower Anchors
6.2 Tether Anchor
7 Step 6: Install a Rear-Facing Car Seat
7.1 6.1 Position the Seat Rear-Facing
7.2 6.2 Choose Your Installation Method
7.3 6.3 Route the Seat Belt Correctly
7.4 6.4 Attach the Lower Anchors If Using LATCH
7.5 6.5 Check the Recline Angle
7.6 6.6 Perform the One-Inch Test
8 Step 7: Install a Forward-Facing Car Seat
8.1 7.1 Place the Seat Forward-Facing
8.2 7.2 Use the Correct Belt Path
8.3 7.3 Attach the Top Tether
8.4 7.4 Perform the One-Inch Test
9 Step 8: Secure Your Child in the Harness
9.1 Position Your Child Correctly
9.2 Check Harness Height
9.3 Make Sure the Harness Is Flat
9.4 Tighten the Harness
9.5 Position the Chest Clip
10 Step 9: Avoid Bulky Clothing Under the Harness
11 Step 10: Check the Installation One More Time
11.1 Car Seat Installation Checklist
12 Seat Belt vs. LATCH: Which Installation Method Should You Use?
12.1 Use the Seat Belt When:
12.2 Use Lower Anchors When:
13 What Is the One-Inch Test?
14 Common Installation Mistakes to Avoid
15 What If the Car Seat Doesn’t Feel Secure?
16 How Often Should You Check Your Car Seat Installation?
17 When Should You Get a Professional Car Seat Check?
18 Final Car Seat Installation Checklist
18.1 Is the seat installed correctly?
18.2 Is my child secured correctly?
19 Final Thoughts
20 Frequently Asked
21 Common Questions

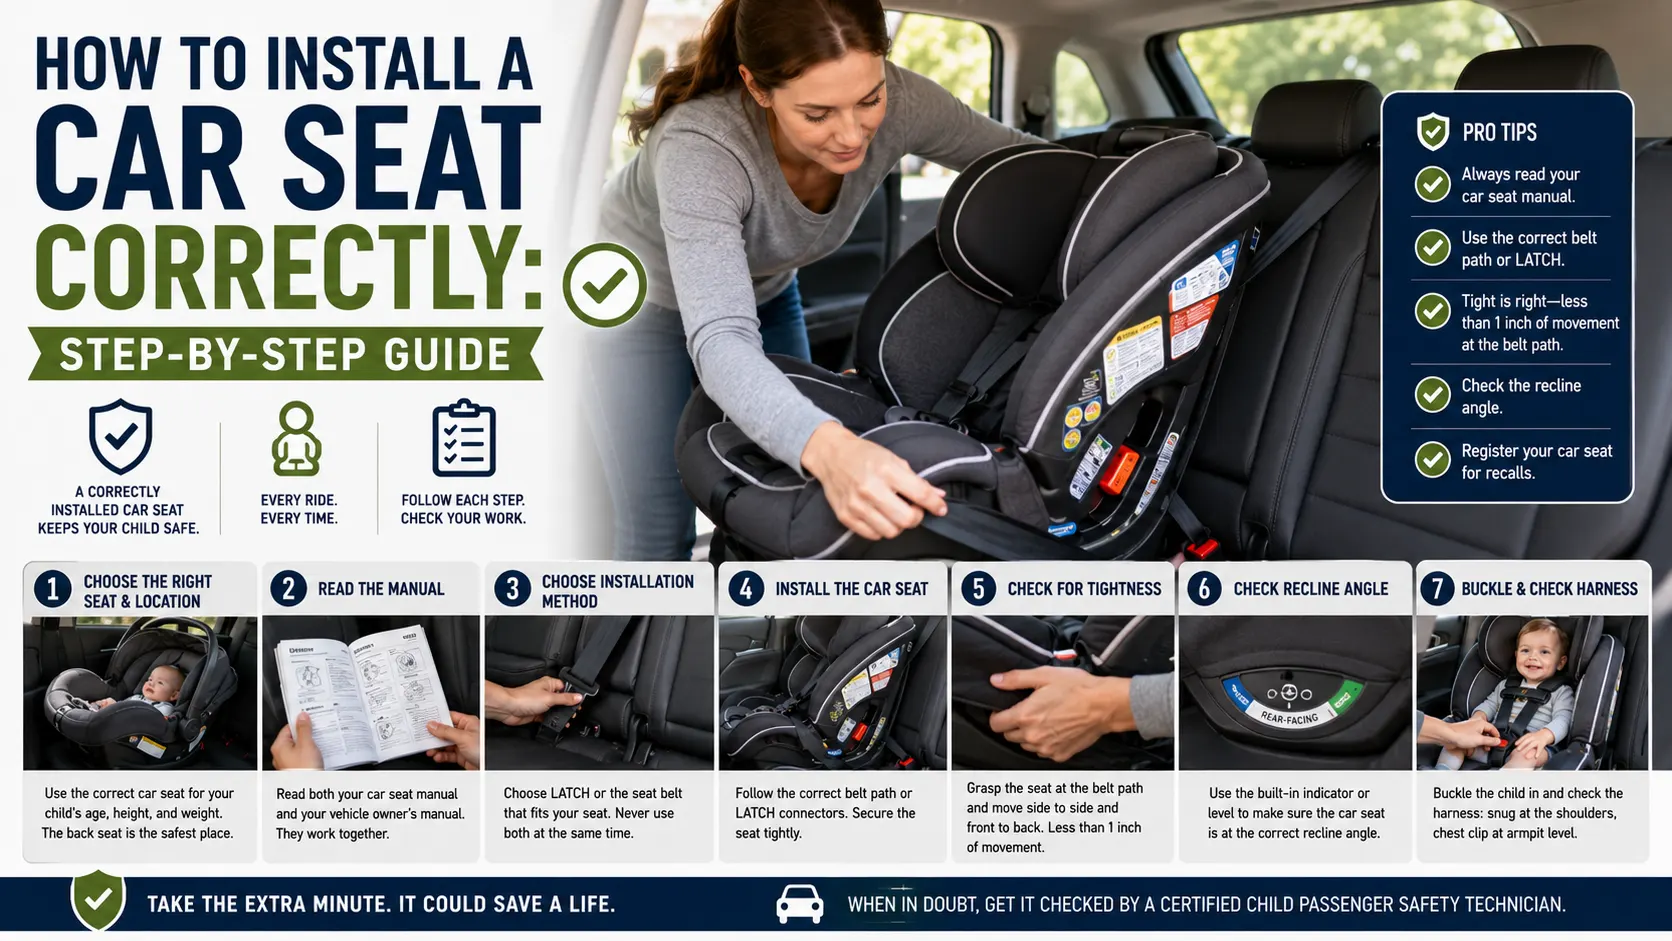
To install a car seat correctly:

  1. Choose the appropriate car seat for your child’s age, height, and weight.
  2. Read the car seat manual and your vehicle owner’s manual.
  3. Place the car seat in an approved rear seating position.
  4. Choose the installation method allowed by the manufacturer: seat belt or lower anchors.
  5. Route the belt or lower-anchor straps through the correct installation path.
  6. Tighten the installation until the seat moves no more than about 1 inch side-to-side or front-to-back at the belt path.
  7. For a forward-facing seat, attach and tighten the top tether when permitted by the car seat and vehicle manufacturers.
  8. Set the correct recline angle for a rear-facing seat.
  9. Secure your child with the harness, making sure the straps are flat and snug.
  10. Position the chest clip at armpit level.

NHTSA recommends following both the car seat manufacturer’s instructions and the vehicle owner’s manual because installation methods and requirements vary between products.

Step 1: Make Sure You Have the Right Car Seat

Before worrying about installation, make sure you’re using the right type of seat for your child.

Depending on your child’s age, height, weight, and developmental stage, you may be using:

  • A rear-facing infant car seat
  • A rear-facing convertible car seat
  • A forward-facing car seat with a harness
  • A booster seat

NHTSA recommends keeping children in the appropriate car seat for as long as possible, provided they remain within the manufacturer’s height and weight limits.

Don’t move your child to the next stage simply because they have reached a certain age. Always check the limits for your particular car seat.

Step 2: Read Both Manuals Before Installing

This is the step parents are most likely to skip—and one of the most important.

You need to understand two separate sets of instructions:

Car seat manual:
Explains the approved belt paths, lower-anchor use, recline positions, harness settings, weight and height limits, tether requirements, and other product-specific instructions.

Vehicle owner’s manual:
Explains approved seating positions, seat-belt locking procedures, lower-anchor locations, tether-anchor locations, and vehicle-specific restrictions.

A car seat that is installed correctly in one vehicle may require a different installation method in another.

Don’t rely on memory

Even if you’ve installed a similar car seat before, read the instructions again when:

  • Installing a new seat
  • Changing vehicles
  • Switching from rear-facing to forward-facing
  • Moving the seat to another seating position
  • Switching from lower anchors to the vehicle seat belt

NHTSA specifically recommends consulting both manuals before installation.

Step 3: Choose the Correct Seating Position

Car seats should generally be installed in the back seat of the vehicle.

However, not every position in the back seat necessarily supports every installation method.

Before choosing a location, check your vehicle owner’s manual for:

  • Approved child-restraint seating positions
  • Lower-anchor locations
  • Tether-anchor locations
  • Seat-belt requirements
  • Any restrictions on center-seat installation

Don’t assume that a center position can use lower anchors simply because it is between two LATCH-equipped positions.

If you’re unsure which position is appropriate, check the vehicle manual or contact the manufacturer.

Step 4: Choose Seat Belt or Lower Anchors

Most car seats can be installed using one of two primary systems:

Option 1: Vehicle Seat Belt

The vehicle’s seat belt is routed through the car seat’s designated belt path and locked according to the vehicle or car seat instructions.

Option 2: Lower Anchors

The car seat’s lower-anchor connectors attach to the vehicle’s lower anchor bars.

Do not automatically use both.

NHTSA states that a car seat should be secured using either the lower anchors or the vehicle seat belt, not both, unless the specific car seat and vehicle manufacturers explicitly allow combined use.

Neither method is automatically better simply because it uses different hardware. The best method is the one that is permitted and that you can install correctly in your particular vehicle.

Step 5: Locate the Correct Installation Points

Before tightening anything, identify the components you will use.

Lower Anchors

Lower anchors are metal bars located in the gap between the vehicle seat back and seat cushion.

They are used with compatible car seat lower-anchor connectors.

Tether Anchor

The tether anchor is used with a forward-facing car seat.

Its location varies between vehicles. Depending on the vehicle, it may be behind the seat, on the rear shelf, on the floor, or in another location specified by the manufacturer.

Never assume that a cargo hook or another nearby metal attachment is a tether anchor.

Use the location identified in your vehicle owner’s manual.

Step 6: Install a Rear-Facing Car Seat

Rear-facing is an important stage of child passenger safety, and NHTSA recommends keeping children rear-facing as long as possible until they reach the maximum height or weight allowed by the car seat manufacturer.

The exact installation procedure varies by model, but the general process is as follows.

6.1 Position the Seat Rear-Facing

Place the car seat or infant seat base on the vehicle’s back seat in the approved rear-facing position.

Make sure the seat is sitting in the orientation specified by the manufacturer.

6.2 Choose Your Installation Method

Use either:

  • The vehicle seat belt, or
  • The lower anchors

Follow the car seat’s instructions for the appropriate rear-facing belt path or lower-anchor attachments.

6.3 Route the Seat Belt Correctly

If using the seat belt:

  1. Find the rear-facing belt path.
  2. Route the seat belt through the correct path.
  3. Make sure the belt is not twisted.
  4. Buckle the seat belt.
  5. Lock the seat belt using the method specified by the vehicle or car seat manufacturer.

NHTSA’s rear-facing installation instructions specifically emphasize using the correct belt path and properly locking the belt.

6.4 Attach the Lower Anchors If Using LATCH

If you’re using lower anchors:

  1. Locate the vehicle’s lower anchors.
  2. Attach the car seat’s lower-anchor connectors.
  3. Make sure the straps are not twisted.
  4. Tighten them according to the car seat’s instructions.

Pay attention to the lower-anchor weight limits. Once your child reaches the applicable limit, the manufacturer may require you to switch to a seat-belt installation.

6.5 Check the Recline Angle

Rear-facing seats need to be installed at the manufacturer’s specified recline angle.

Many car seats include:

  • A level indicator
  • A bubble indicator
  • A line indicator
  • A built-in recline adjustment

Use the indicator on your specific seat rather than copying the angle from another model.

6.6 Perform the One-Inch Test

Hold the car seat at or immediately next to the belt path and pull it from side to side and front to back.

The seat should not move more than approximately 1 inch in either direction at the belt path.

Don’t perform this test by aggressively pulling the top of the seat. The test is specifically about movement at the installation point.

Step 7: Install a Forward-Facing Car Seat

When a child has outgrown the rear-facing height or weight limit of their car seat, they may transition to a forward-facing seat with a harness and tether, according to the manufacturer’s instructions.

7.1 Place the Seat Forward-Facing

Place the car seat in an approved rear seating position facing toward the front of the vehicle.

Confirm that the seat is in the correct recline position specified for forward-facing use.

7.2 Use the Correct Belt Path

If installing with a seat belt:

  1. Locate the forward-facing belt path.
  2. Route the seat belt through it.
  3. Make sure the belt is not twisted.
  4. Buckle it.
  5. Lock it according to the vehicle or car seat instructions.
  6. Tighten the installation.

If using lower anchors, attach the connectors to the vehicle’s approved lower anchors and tighten them according to the manual.

NHTSA provides separate installation procedures for both seat-belt and lower-anchor installations.

7.3 Attach the Top Tether

This is an essential part of forward-facing installation.

Connect the car seat’s tether strap to the designated tether anchor in the vehicle and tighten it according to the manufacturer’s instructions.

The tether helps limit forward movement of the car seat and child’s head during a crash.

NHTSA recommends using the tether with a forward-facing car seat when its use is permitted by both the car seat and vehicle manufacturers.

7.4 Perform the One-Inch Test

Once the seat is installed, hold it at the belt path and check for movement.

It should not move more than approximately one inch side-to-side or front-to-back.

If it moves more than that, remove slack and reinstall the seat according to the manufacturer’s instructions.

Step 8: Secure Your Child in the Harness

Correct installation of the car seat is only half the job.

Your child must also be properly secured inside it.

Position Your Child Correctly

Have your child sit with:

  • Their back against the car seat
  • Their bottom positioned properly in the seat
  • Their shoulders positioned correctly beneath the harness
  • Their body centered in the seat

Check Harness Height

The correct harness slot depends on the direction of travel.

Rear-facing: Harness straps should generally come through slots at or below the child’s shoulders.

Forward-facing: Harness straps should generally come through slots at or above the child’s shoulders.

Always verify the exact requirement in your car seat’s manual because some models have specific harness configurations.

Make Sure the Harness Is Flat

Check both straps before tightening.

They should:

  • Lie flat
  • Not be twisted
  • Sit correctly over the child’s shoulders
  • Be routed through the correct harness slots

Twisted straps should be straightened before driving.

Tighten the Harness

Buckle the harness and tighten it until it is snug against your child.

A properly tightened harness should not allow you to pinch extra webbing at the shoulder.

Position the Chest Clip

Move the chest clip to approximately armpit level.

The chest clip helps keep the harness straps properly positioned across the child’s chest and shoulders.

Step 9: Avoid Bulky Clothing Under the Harness

Heavy coats and bulky winter clothing can interfere with proper harness fit.

The extra material can compress during a crash, potentially creating additional space between the child and the harness.

Instead:

  1. Place the child in the seat.
  2. Fasten and tighten the harness directly against the child.
  3. Place a coat, blanket, or other appropriate layer over the secured harness.

NHTSA specifically warns that bulky clothing can prevent a snug harness fit.

Step 10: Check the Installation One More Time

Before driving, perform a complete inspection.

Car Seat Installation Checklist

☐ Car seat is in an approved rear seating position.

☐ Correct rear-facing or forward-facing orientation.

☐ Correct belt path is being used.

☐ Seat belt or lower anchors are installed according to instructions.

☐ Seat belt is properly locked if using the seat belt.

☐ Lower-anchor weight limits have not been exceeded.

☐ Forward-facing tether is attached when required/permitted.

☐ Rear-facing seat has the correct recline angle.

☐ Seat moves no more than approximately 1 inch at the belt path.

☐ Harness straps are flat and untwisted.

☐ Harness is snug.

☐ Chest clip is at armpit level.

☐ Child is within the seat’s height and weight limits.

This final check can help catch mistakes that aren’t obvious at first glance.

Seat Belt vs. LATCH: Which Installation Method Should You Use?

Parents often wonder whether they should use the seat belt or LATCH system.

The answer is not simply “one is safer.”

Both systems can provide a safe installation when used correctly and according to the manufacturer’s instructions. The key is choosing a method that is approved for your particular car seat and vehicle and installing it correctly.

Use the Seat Belt When:

  • Your vehicle doesn’t have lower anchors in the desired position.
  • Your child has exceeded the applicable lower-anchor weight limit.
  • Your car seat manufacturer specifies seat-belt installation.
  • The seat belt provides a better fit in your vehicle.

Use Lower Anchors When:

  • Your vehicle has compatible lower anchors.
  • Your car seat allows lower-anchor installation.
  • Your child remains within the applicable weight limits.
  • You can achieve a secure installation using the system.

Remember: do not use the seat belt and lower anchors together unless your specific manufacturers allow it.

What Is the One-Inch Test?

The one-inch test is a simple way to check whether a car seat is sufficiently secured.

After installation, grip the seat near the belt path and move it:

  • Side to side
  • Front to back

The seat should not move more than approximately 1 inch in either direction.

A common mistake is checking movement by pulling the top of the car seat. That’s not the point of the test. Focus on the area where the seat is secured to the vehicle.

Common Installation Mistakes to Avoid

Even after following the general steps above, parents commonly make mistakes such as:

  • Using the wrong belt path
  • Failing to lock the seat belt
  • Installing the seat too loosely
  • Using both LATCH and the seat belt when not permitted
  • Forgetting the forward-facing tether
  • Using the wrong recline angle
  • Installing the harness at the wrong height
  • Leaving harness straps twisted
  • Keeping the harness too loose
  • Positioning the chest clip too low
  • Putting a bulky coat underneath the harness
  • Using unapproved aftermarket accessories
  • Ignoring lower-anchor weight limits
  • Assuming every seating position is compatible

The exact solution depends on the car seat and vehicle, which is why the manuals should always be treated as the final authority.

What If the Car Seat Doesn’t Feel Secure?

If the seat still moves more than approximately one inch at the belt path after you’ve followed the manufacturer’s installation instructions, don’t simply drive with it and hope it is fine.

Remove the seat and reinstall it carefully.

Check:

  1. Is the correct belt path being used?
  2. Is the seat belt properly locked?
  3. Are the lower-anchor connectors attached correctly?
  4. Is there slack in the installation strap or seat belt?
  5. Is the seat positioned correctly?
  6. Are you using an approved seating position?
  7. Is the installation method allowed for this specific model?

If you’re still having trouble, seek help from a certified Child Passenger Safety Technician.

NHTSA provides inspection resources, and certified technicians can inspect your installation and show you how to use your seat correctly.

How Often Should You Check Your Car Seat Installation?

You don’t necessarily need to completely reinstall your car seat every day, but you should check its installation regularly.

Recheck it whenever:

  • You move the car seat.
  • You change vehicles.
  • You switch from rear-facing to forward-facing.
  • Your child grows significantly.
  • You change the harness height.
  • You reach the lower-anchor weight limit.
  • You remove the seat for cleaning.
  • Someone else reinstalls the seat.
  • The seat becomes loose.

Also check the harness fit every time your child rides.

When Should You Get a Professional Car Seat Check?

If you’re uncertain about your installation, getting hands-on assistance is better than guessing.

A certified Child Passenger Safety Technician can check:

  • Car seat orientation
  • Installation method
  • Belt path
  • Lower-anchor attachment
  • Tether attachment
  • Recline angle
  • Harness height
  • Harness tightness
  • Chest clip position
  • Overall fit

NHTSA notes that many inspection services are free and that some communities also offer virtual inspections.

Final Car Seat Installation Checklist

Before you start the engine, ask yourself:

Is the seat installed correctly?

  • Is it in the back seat?
  • Is it facing the correct direction?
  • Is the correct belt path being used?
  • Is the seat belt or lower-anchor system installed correctly?
  • Is the seat properly locked and tightened?
  • Does it move no more than about 1 inch at the belt path?
  • Is the rear-facing recline angle correct?
  • Is the forward-facing tether attached when required/permitted?

Is my child secured correctly?

  • Is your child’s back and bottom positioned correctly?
  • Are the harness straps at the correct height?
  • Are the straps flat and untwisted?
  • Is the harness snug enough?
  • Can you avoid pinching extra harness material at the shoulder?
  • Is the chest clip at armpit level?
  • Is bulky clothing outside the harness?
  • Is your child within the seat’s height and weight limits?

If the answer is yes to all of these, you’ve completed the major checks recommended by NHTSA and other child passenger safety organizations.

Final Thoughts

Learning how to install a car seat correctly isn’t about finding one universal installation method. The correct process depends on the specific car seat, vehicle, seating position, and your child’s size.

The most important rules are simple:

Read both manuals. Use the correct installation method. Tighten the seat properly. Use the tether for forward-facing installation when permitted. Check the recline angle. And make sure the harness fits your child snugly.

If you’re unsure about any part of the installation, don’t guess. Have the seat checked by a certified Child Passenger Safety Technician.

A few extra minutes spent checking your installation can make a significant difference in ensuring your child’s restraint is being used as designed.

Continue exploring: browse the full Baby Safety hub.

Frequently Asked

Common Questions

The harness should fit snugly against your child's body. After tightening, you should not be able to pinch extra harness webbing at the child's shoulder. The chest clip should be positioned at approximately armpit level.
Yes, NHTSA recommends using the top tether with a forward-facing car seat when its use is permitted by both the car seat and vehicle manufacturers. The tether helps reduce forward movement during a crash.
At the belt path, the car seat should generally move no more than about 1 inch side-to-side or front-to-back when you test it.
Installing a car seat correctly is one of the most important things you can do to protect your child in the vehicle. But even a high-quality car seat cannot provide its intended protection if it is installed incorrectly or if the harness does not fit your child properly. The good news is that safe installation doesn't have to be complicated. The key is to follow the instructions for both your car seat and your vehicle, use the correct installation method, and check the fit every time your child rides. In this guide, we'll walk through how to install a car seat correctly step by step, including rear-facing and forward-facing installation, seat belts versus lower anchors, tether use, recline angle, harness adjustment, and the final safety checks you should perform before driving. Important: This guide provides general installation information. Your specific car seat and vehicle may have different requirements. Always follow the manufacturer's instructions for your exact model. Quick Answer: How Do You Install a Car Seat Correctly? To install a car seat correctly: Choose the appropriate car seat for your child's age, height, and weight. Read the car seat manual and your vehicle owner's manual. Place the car seat in an approved rear seating position. Choose the installation method allowed by the manufacturer: seat belt or lower anchors. Route the belt or lower-anchor straps through the correct installation path. Tighten the installation until the seat moves no more than about 1 inch side-to-side or front-to-back at the belt path. For a forward-facing seat, attach and tighten the top tether when permitted by the car seat and vehicle manufacturers. Set the correct recline angle for a rear-facing seat. Secure your child with the harness, making sure the straps are flat and snug. Position the chest clip at armpit level. NHTSA recommends following both the car seat manufacturer's instructions and the vehicle owner's manual because installation methods and requirements vary between products. Step 1: Make Sure You Have the Right Car Seat Before worrying about installation, make sure you're using the right type of seat for your child. Depending on your child's age, height, weight, and developmental stage, you may be using: A rear-facing infant car seat A rear-facing convertible car seat A forward-facing car seat with a harness A booster seat NHTSA recommends keeping children in the appropriate car seat for as long as possible, provided they remain within the manufacturer's height and weight limits. Don't move your child to the next stage simply because they have reached a certain age. Always check the limits for your particular car seat. Step 2: Read Both Manuals Before Installing This is the step parents are most likely to skip—and one of the most important. You need to understand two separate sets of instructions: Car seat manual: Explains the approved belt paths, lower-anchor use, recline positions, harness settings, weight and height limits, tether requirements, and other product-specific instructions. Vehicle owner's manual: Explains approved seating positions, seat-belt locking procedures, lower-anchor locations, tether-anchor locations, and vehicle-specific restrictions. A car seat that is installed correctly in one vehicle may require a different installation method in another. Don't rely on memory Even if you've installed a similar car seat before, read the instructions again when: Installing a new seat Changing vehicles Switching from rear-facing to forward-facing Moving the seat to another seating position Switching from lower anchors to the vehicle seat belt NHTSA specifically recommends consulting both manuals before installation. Step 3: Choose the Correct Seating Position Car seats should generally be installed in the back seat of the vehicle. However, not every position in the back seat necessarily supports every installation method. Before choosing a location, check your vehicle owner's manual for: Approved child-restraint seating positions Lower-anchor locations Tether-anchor locations Seat-belt requirements Any restrictions on center-seat installation Don't assume that a center position can use lower anchors simply because it is between two LATCH-equipped positions. If you're unsure which position is appropriate, check the vehicle manual or contact the manufacturer. Step 4: Choose Seat Belt or Lower Anchors Most car seats can be installed using one of two primary systems: Option 1: Vehicle Seat Belt The vehicle's seat belt is routed through the car seat's designated belt path and locked according to the vehicle or car seat instructions. Option 2: Lower Anchors The car seat's lower-anchor connectors attach to the vehicle's lower anchor bars. Do not automatically use both. NHTSA states that a car seat should be secured using either the lower anchors or the vehicle seat belt, not both, unless the specific car seat and vehicle manufacturers explicitly allow combined use. Neither method is automatically better simply because it uses different hardware. The best method is the one that is permitted and that you can install correctly in your particular vehicle. Step 5: Locate the Correct Installation Points Before tightening anything, identify the components you will use. Lower Anchors Lower anchors are metal bars located in the gap between the vehicle seat back and seat cushion. They are used with compatible car seat lower-anchor connectors. Tether Anchor The tether anchor is used with a forward-facing car seat. Its location varies between vehicles. Depending on the vehicle, it may be behind the seat, on the rear shelf, on the floor, or in another location specified by the manufacturer. Never assume that a cargo hook or another nearby metal attachment is a tether anchor. Use the location identified in your vehicle owner's manual. Step 6: Install a Rear-Facing Car Seat Rear-facing is an important stage of child passenger safety, and NHTSA recommends keeping children rear-facing as long as possible until they reach the maximum height or weight allowed by the car seat manufacturer. The exact installation procedure varies by model, but the general process is as follows. 6.1 Position the Seat Rear-Facing Place the car seat or infant seat base on the vehicle's back seat in the approved rear-facing position. Make sure the seat is sitting in the orientation specified by the manufacturer. 6.2 Choose Your Installation Method Use either: The vehicle seat belt, or The lower anchors Follow the car seat's instructions for the appropriate rear-facing belt path or lower-anchor attachments. 6.3 Route the Seat Belt Correctly If using the seat belt: Find the rear-facing belt path. Route the seat belt through the correct path. Make sure the belt is not twisted. Buckle the seat belt. Lock the seat belt using the method specified by the vehicle or car seat manufacturer. NHTSA's rear-facing installation instructions specifically emphasize using the correct belt path and properly locking the belt. 6.4 Attach the Lower Anchors If Using LATCH If you're using lower anchors: Locate the vehicle's lower anchors. Attach the car seat's lower-anchor connectors. Make sure the straps are not twisted. Tighten them according to the car seat's instructions. Pay attention to the lower-anchor weight limits. Once your child reaches the applicable limit, the manufacturer may require you to switch to a seat-belt installation. 6.5 Check the Recline Angle Rear-facing seats need to be installed at the manufacturer's specified recline angle. Many car seats include: A level indicator A bubble indicator A line indicator A built-in recline adjustment Use the indicator on your specific seat rather than copying the angle from another model. 6.6 Perform the One-Inch Test Hold the car seat at or immediately next to the belt path and pull it from side to side and front to back. The seat should not move more than approximately 1 inch in either direction at the belt path. Don't perform this test by aggressively pulling the top of the seat. The test is specifically about movement at the installation point. Step 7: Install a Forward-Facing Car Seat When a child has outgrown the rear-facing height or weight limit of their car seat, they may transition to a forward-facing seat with a harness and tether, according to the manufacturer's instructions. 7.1 Place the Seat Forward-Facing Place the car seat in an approved rear seating position facing toward the front of the vehicle. Confirm that the seat is in the correct recline position specified for forward-facing use. 7.2 Use the Correct Belt Path If installing with a seat belt: Locate the forward-facing belt path. Route the seat belt through it. Make sure the belt is not twisted. Buckle it. Lock it according to the vehicle or car seat instructions. Tighten the installation. If using lower anchors, attach the connectors to the vehicle's approved lower anchors and tighten them according to the manual. NHTSA provides separate installation procedures for both seat-belt and lower-anchor installations. 7.3 Attach the Top Tether This is an essential part of forward-facing installation. Connect the car seat's tether strap to the designated tether anchor in the vehicle and tighten it according to the manufacturer's instructions. The tether helps limit forward movement of the car seat and child's head during a crash. NHTSA recommends using the tether with a forward-facing car seat when its use is permitted by both the car seat and vehicle manufacturers. 7.4 Perform the One-Inch Test Once the seat is installed, hold it at the belt path and check for movement. It should not move more than approximately one inch side-to-side or front-to-back. If it moves more than that, remove slack and reinstall the seat according to the manufacturer's instructions. Step 8: Secure Your Child in the Harness Correct installation of the car seat is only half the job. Your child must also be properly secured inside it. Position Your Child Correctly Have your child sit with: Their back against the car seat Their bottom positioned properly in the seat Their shoulders positioned correctly beneath the harness Their body centered in the seat Check Harness Height The correct harness slot depends on the direction of travel. Rear-facing: Harness straps should generally come through slots at or below the child's shoulders. Forward-facing: Harness straps should generally come through slots at or above the child's shoulders. Always verify the exact requirement in your car seat's manual because some models have specific harness configurations. Make Sure the Harness Is Flat Check both straps before tightening. They should: Lie flat Not be twisted Sit correctly over the child's shoulders Be routed through the correct harness slots Twisted straps should be straightened before driving. Tighten the Harness Buckle the harness and tighten it until it is snug against your child. A properly tightened harness should not allow you to pinch extra webbing at the shoulder. Position the Chest Clip Move the chest clip to approximately armpit level. The chest clip helps keep the harness straps properly positioned across the child's chest and shoulders. Step 9: Avoid Bulky Clothing Under the Harness Heavy coats and bulky winter clothing can interfere with proper harness fit. The extra material can compress during a crash, potentially creating additional space between the child and the harness. Instead: Place the child in the seat. Fasten and tighten the harness directly against the child. Place a coat, blanket, or other appropriate layer over the secured harness. NHTSA specifically warns that bulky clothing can prevent a snug harness fit. Step 10: Check the Installation One More Time Before driving, perform a complete inspection. Car Seat Installation Checklist ☐ Car seat is in an approved rear seating position. ☐ Correct rear-facing or forward-facing orientation. ☐ Correct belt path is being used. ☐ Seat belt or lower anchors are installed according to instructions. ☐ Seat belt is properly locked if using the seat belt. ☐ Lower-anchor weight limits have not been exceeded. ☐ Forward-facing tether is attached when required/permitted. ☐ Rear-facing seat has the correct recline angle. ☐ Seat moves no more than approximately 1 inch at the belt path. ☐ Harness straps are flat and untwisted. ☐ Harness is snug. ☐ Chest clip is at armpit level. ☐ Child is within the seat's height and weight limits. This final check can help catch mistakes that aren't obvious at first glance. Seat Belt vs. LATCH: Which Installation Method Should You Use? Parents often wonder whether they should use the seat belt or LATCH system. The answer is not simply "one is safer." Both systems can provide a safe installation when used correctly and according to the manufacturer's instructions. The key is choosing a method that is approved for your particular car seat and vehicle and installing it correctly. Use the Seat Belt When: Your vehicle doesn't have lower anchors in the desired position. Your child has exceeded the applicable lower-anchor weight limit. Your car seat manufacturer specifies seat-belt installation. The seat belt provides a better fit in your vehicle. Use Lower Anchors When: Your vehicle has compatible lower anchors. Your car seat allows lower-anchor installation. Your child remains within the applicable weight limits. You can achieve a secure installation using the system. Remember: do not use the seat belt and lower anchors together unless your specific manufacturers allow it. What Is the One-Inch Test? The one-inch test is a simple way to check whether a car seat is sufficiently secured. After installation, grip the seat near the belt path and move it: Side to side Front to back The seat should not move more than approximately 1 inch in either direction. A common mistake is checking movement by pulling the top of the car seat. That's not the point of the test. Focus on the area where the seat is secured to the vehicle. Common Installation Mistakes to Avoid Even after following the general steps above, parents commonly make mistakes such as: Using the wrong belt path Failing to lock the seat belt Installing the seat too loosely Using both LATCH and the seat belt when not permitted Forgetting the forward-facing tether Using the wrong recline angle Installing the harness at the wrong height Leaving harness straps twisted Keeping the harness too loose Positioning the chest clip too low Putting a bulky coat underneath the harness Using unapproved aftermarket accessories Ignoring lower-anchor weight limits Assuming every seating position is compatible The exact solution depends on the car seat and vehicle, which is why the manuals should always be treated as the final authority. What If the Car Seat Doesn't Feel Secure? If the seat still moves more than approximately one inch at the belt path after you've followed the manufacturer's installation instructions, don't simply drive with it and hope it is fine. Remove the seat and reinstall it carefully. Check: Is the correct belt path being used? Is the seat belt properly locked? Are the lower-anchor connectors attached correctly? Is there slack in the installation strap or seat belt? Is the seat positioned correctly? Are you using an approved seating position? Is the installation method allowed for this specific model? If you're still having trouble, seek help from a certified Child Passenger Safety Technician. NHTSA provides inspection resources, and certified technicians can inspect your installation and show you how to use your seat correctly. How Often Should You Check Your Car Seat Installation? You don't necessarily need to completely reinstall your car seat every day, but you should check its installation regularly. Recheck it whenever: You move the car seat. You change vehicles. You switch from rear-facing to forward-facing. Your child grows significantly. You change the harness height. You reach the lower-anchor weight limit. You remove the seat for cleaning. Someone else reinstalls the seat. The seat becomes loose. Also check the harness fit every time your child rides. When Should You Get a Professional Car Seat Check? If you're uncertain about your installation, getting hands-on assistance is better than guessing. A certified Child Passenger Safety Technician can check: Car seat orientation Installation method Belt path Lower-anchor attachment Tether attachment Recline angle Harness height Harness tightness Chest clip position Overall fit NHTSA notes that many inspection services are free and that some communities also offer virtual inspections. Final Car Seat Installation Checklist Before you start the engine, ask yourself: Is the seat installed correctly? Is it in the back seat? Is it facing the correct direction? Is the correct belt path being used? Is the seat belt or lower-anchor system installed correctly? Is the seat properly locked and tightened? Does it move no more than about 1 inch at the belt path? Is the rear-facing recline angle correct? Is the forward-facing tether attached when required/permitted? Is my child secured correctly? Is your child's back and bottom positioned correctly? Are the harness straps at the correct height? Are the straps flat and untwisted? Is the harness snug enough? Can you avoid pinching extra harness material at the shoulder? Is the chest clip at armpit level? Is bulky clothing outside the harness? Is your child within the seat's height and weight limits? If the answer is yes to all of these, you've completed the major checks recommended by NHTSA and other child passenger safety organizations. Final Thoughts Learning how to install a car seat correctly isn't about finding one universal installation method. The correct process depends on the specific car seat, vehicle, seating position, and your child's size. The most important rules are simple: Read both manuals. Use the correct installation method. Tighten the seat properly. Use the tether for forward-facing installation when permitted. Check the recline angle. And make sure the harness fits your child snugly. If you're unsure about any part of the installation, don't guess. Have the seat checked by a certified Child Passenger Safety Technician. A few extra minutes spent checking your installation can make a significant difference in ensuring your child's restraint is being used as designed. Frequently Asked Questions 1. Can I install a car seat with both LATCH and the seat belt? Usually, no. NHTSA recommends securing the car seat with either the vehicle seat belt or lower anchors, unless the specific car seat and vehicle manufacturers explicitly allow both methods to be used together. 2. How tight should a car seat be after installation? At the belt path, the car seat should generally move no more than about 1 inch side-to-side or front-to-back when you test it. 3. Should I use the top tether on a forward-facing car seat? Yes, NHTSA recommends using the top tether with a forward-facing car seat when its use is permitted by both the car seat and vehicle manufacturers. The tether helps reduce forward movement during a crash. 4. How do I know if my child's harness is tight enough? The harness should fit snugly against your child's body. After tightening, you should not be able to pinch extra harness webbing at the child's shoulder. The chest clip should be positioned at approximately armpit level.
Author

Ali

Digital Marketing enthusiast with a passion for SEO, web design, analytics, and creative problem-solving.

Follow Me
Other Articles
Previous

Common Car Seat Installation Mistakes (and How to Fix Them)

Next

LATCH vs. Seat Belt Installation: Which Is Safer?

No Comment! Be the first one.

Leave a Reply Cancel reply

Your email address will not be published. Required fields are marked *

What is Did You Search?

The “Did You Search” website was created for all mothers and families. Just search to find all your needs about your children.

Links

  • about
  • contact
  • privacy policy
  • medical disclaimer
  • sitemap
Copyright 2026 — DidYouSearch. All rights reserved.