
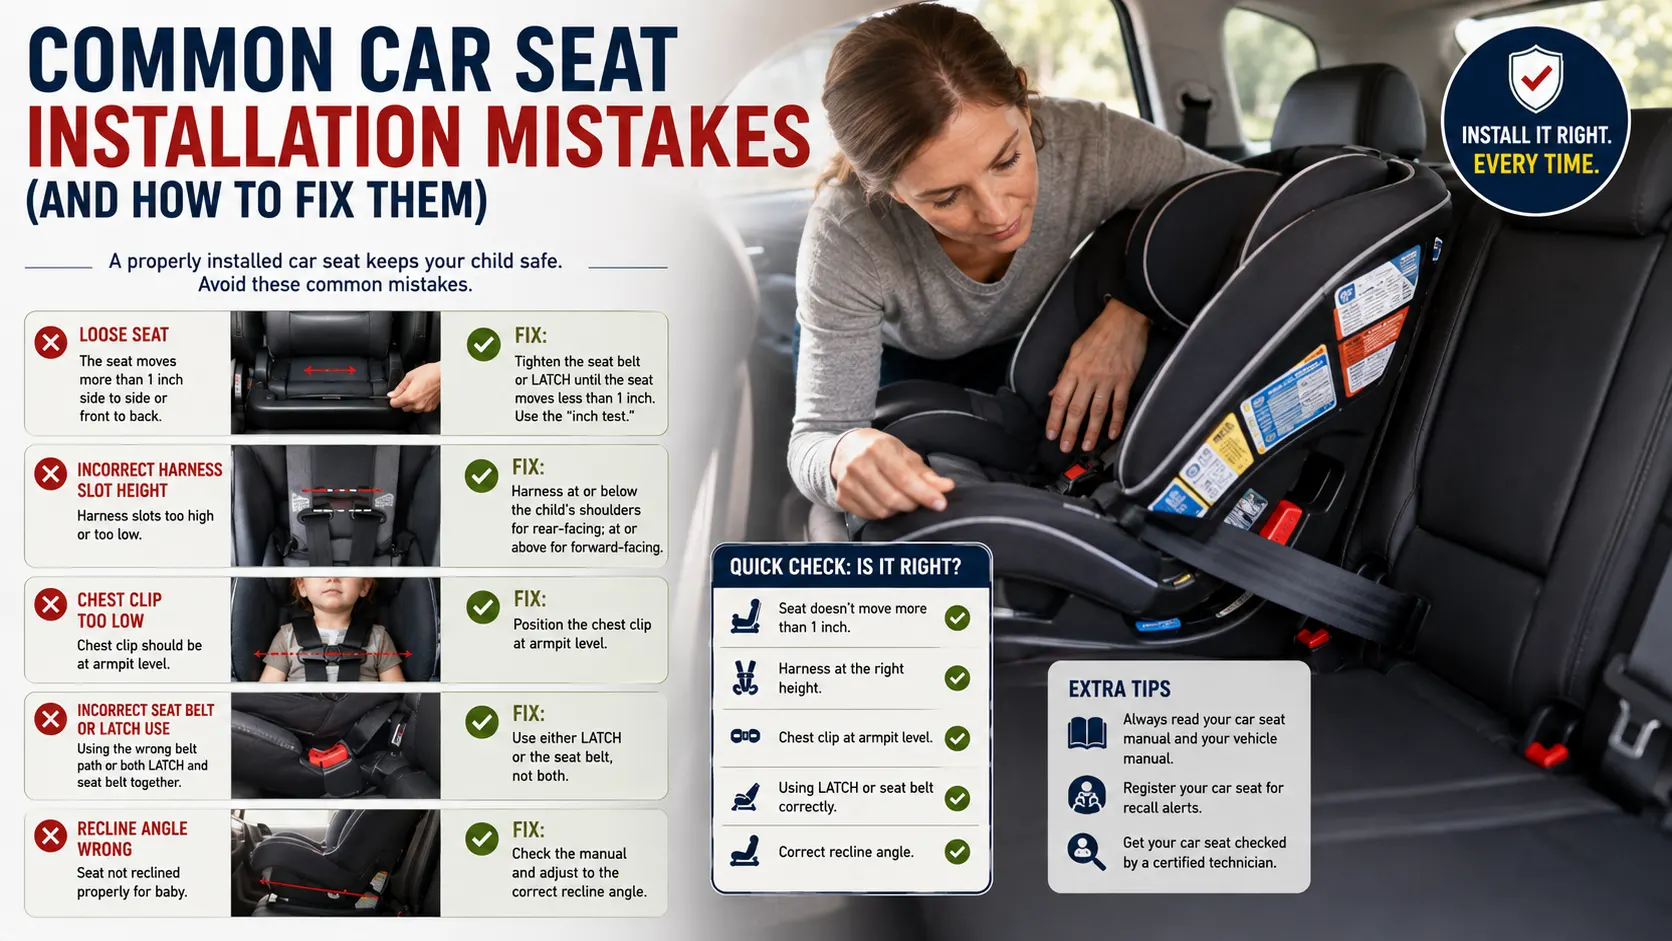

Installing a car seat can look simple, but small mistakes can make a major difference in how well the seat protects your child during a crash.
In fact, NHTSA has found that about 46% of car seats and booster seats had at least one major installation or use error that could reduce their effectiveness in a crash.
The good news is that many common mistakes are easy to correct once you know what to look for.
Whether you are installing an infant car seat, convertible car seat, or forward-facing seat, the safest starting point is always the same: read the car seat manufacturer’s instructions and your vehicle owner’s manual. Every car seat and vehicle combination is different, and a method that works for one setup may not be permitted for another.
Below are the most common car seat installation mistakes parents and caregivers make—and exactly what to check to fix them.
1. Not Reading Both Manuals
One of the most common mistakes happens before installation even begins: relying on memory, online videos, or a previous car seat installation instead of reading the instructions.
Your car seat manual explains how that specific seat should be installed, including approved belt paths, recline positions, harness settings, weight limits, and tether requirements.
Your vehicle owner’s manual explains where child restraints can be installed and how your vehicle’s seat belts, lower anchors, and tether anchors are designed to work.
How to fix it
Before installing the seat:
- Read the car seat manufacturer’s manual.
- Find the child-seat section in your vehicle owner’s manual.
- Confirm which seating positions are approved.
- Check whether your vehicle uses a specific seat-belt locking mechanism.
- Follow the manufacturer’s instructions for LATCH/lower-anchor weight limits.
- Keep both manuals available for future adjustments.
Don’t assume that because you’ve installed a car seat before, the same process applies to every seat or vehicle.
2. Using the Wrong Belt Path
Car seats often have different belt paths depending on whether they are installed rear-facing or forward-facing.
Routing the vehicle seat belt through the wrong opening can prevent the seat from being secured as designed.
This mistake can be particularly easy to make with convertible car seats because the correct belt path can change when the seat changes from rear-facing to forward-facing.
How to fix it
Look carefully at:
- The car seat labels
- The installation diagrams
- The manufacturer’s manual
- The rear-facing and forward-facing belt-path markings
Thread the seat belt exactly where the manufacturer indicates.
If you’re using a seat belt installation, make sure the belt is properly locked according to your vehicle and car seat instructions.
3. Using the Seat Belt and Lower Anchors Together When Not Allowed
Another common misconception is that using both the vehicle seat belt and lower anchors must automatically make a car seat more secure.
That’s not necessarily true.
NHTSA states that a car seat should be installed using either the lower anchors or the vehicle seat belt, not both, unless the specific car seat manufacturer explicitly permits a particular combined installation.
How to fix it
Choose the installation method permitted by your car seat and vehicle manufacturers:
- Seat belt installation, or
- Lower-anchor/LATCH installation
Then follow the instructions for that method exactly.
Don’t add an extra attachment simply because it seems like it would make the installation stronger.
4. Not Getting the Car Seat Tight Enough
A car seat should not slide freely around the vehicle seat.
After installation, check movement at the belt path, not by grabbing the top of the car seat and shaking it aggressively.
NHTSA recommends that a properly installed car seat should not move more than 1 inch side-to-side or front-to-back when pulled at the belt path.
How to fix it: The Inch Test
Once the seat is installed:
- Place one hand near the belt path.
- Hold the car seat firmly.
- Pull it from side to side and front to back.
- Check how much movement occurs.
If it moves more than about one inch in either direction at the belt path, remove slack from the installation and tighten it according to the manufacturer’s instructions.
Don’t judge installation tightness by how much the top of the seat moves. A properly installed car seat can still have some movement at the top.
5. Forgetting the Top Tether on a Forward-Facing Seat
The top tether is one of the most frequently overlooked parts of forward-facing car seat installation.
The tether connects the top portion of a forward-facing car seat to an anchor in the vehicle. It helps limit forward movement of the child’s head during a crash.
How to fix it
For a forward-facing car seat:
- Locate the vehicle’s designated tether anchor.
- Attach the car seat’s tether strap.
- Tighten it according to the manufacturer’s instructions.
- Confirm that you are attaching it to the correct anchor—not a cargo hook or another nearby fitting.
NHTSA recommends using the tether with a forward-facing car seat when permitted by both the car seat and vehicle manufacturers.
Important: Never assume that a hook that looks strong is a tether anchor. Check the vehicle owner’s manual.
6. Installing a Rear-Facing Seat at the Wrong Angle
Rear-facing car seats are designed to sit at a specific recline angle.
Installing the seat too upright or too reclined can affect how the seat functions and, for infants, can affect positioning.
Many rear-facing car seats include built-in angle indicators or recline adjusters to help parents achieve the correct position.
How to fix it
Before tightening the installation:
- Place the seat in the appropriate rear-facing position.
- Find the manufacturer’s angle indicator.
- Adjust the recline position as instructed.
- Install and tighten the seat.
- Recheck the angle after tightening.
Don’t use a generic angle recommendation from another car seat. The correct angle can vary between models.
7. Harness Straps Are Too Loose
A correctly installed car seat can still be unsafe if the child isn’t properly secured in the harness.
One of the most common mistakes is leaving the harness too loose.
NHTSA recommends tightening the harness so that you cannot pinch extra webbing at the child’s shoulder.
How to fix it
After placing your child in the seat:
- Make sure their back and bottom are positioned correctly.
- Buckle the harness.
- Remove slack around the hips and shoulders.
- Tighten the harness using the adjustment strap.
- Perform the pinch test at the shoulder.
If you can pinch a fold of harness webbing between your fingers, the harness likely needs to be tightened further.
8. Putting Harness Straps at the Wrong Height
Harness height matters, and the correct position depends on whether your child is rear-facing or forward-facing.
For rear-facing children, NHTSA says harness straps should come through slots at or below the child’s shoulders.
For forward-facing children, the straps should come through slots at or above the shoulders.
How to fix it
Check your specific car seat manual and adjust the harness to the correct slot for your child’s current position.
Don’t choose a slot simply because it seems more comfortable or because it was correct for your child several months ago.
Children grow quickly, so harness height should be checked regularly.
9. Placing the Chest Clip Too Low
The chest clip is another small component that parents sometimes position incorrectly.
It should sit at approximately armpit level, rather than near the child’s stomach or across the neck.
How to fix it
After buckling the harness:
- Bring both harness straps into the correct position.
- Fasten the chest clip.
- Slide the clip upward until it sits at armpit level.
- Tighten the harness so it is snug.
The chest clip helps keep the harness straps positioned correctly on the child’s body, but it should not be used as a substitute for tightening the harness.
10. Leaving the Harness Straps Twisted
Harness straps should lie flat against the child.
Twisted webbing can change how the harness sits against the body and is therefore something you should correct before every trip.
How to fix it
Before buckling your child:
- Check both harness straps.
- Straighten any twists.
- Make sure the straps lie flat.
- Buckle the harness.
- Tighten it snugly.
If the harness frequently twists, check whether the straps are being routed correctly through the buckle and harness system according to the manufacturer’s instructions.
11. Putting Bulky Clothing Under the Harness
During cold weather, parents may be tempted to put a child in a thick winter coat and then tighten the harness over it.
The problem is that bulky clothing can create extra space between the child and harness.
That space may compress during a crash, leaving the harness less snug than it appeared during installation.
How to fix it
Instead of placing thick layers underneath the harness:
- Dress your child in thinner layers.
- Secure the harness snugly against the child’s body.
- Add a blanket or outer layer over the properly tightened harness if needed.
- Never place bulky padding under the harness unless it is specifically approved by the manufacturer.
Always check your car seat manufacturer’s instructions for approved accessories and clothing guidance.
12. Adding Aftermarket Padding or Accessories
Head supports, cushions, strap covers, mirrors, inserts, toys, and other accessories may look harmless, but not every product is approved for use with every car seat.
A product that wasn’t tested or approved with your particular seat may interfere with how the harness fits or how the seat performs.
How to fix it
Before adding an accessory:
- Check your car seat manual.
- Confirm whether the manufacturer approves it.
- Use only the correct insert or padding supplied or approved for your model.
- Avoid adding padding behind or underneath your child unless the manufacturer specifically allows it.
When it comes to car seat accessories, more padding does not necessarily mean more protection.
13. Installing the Car Seat in an Unapproved Seating Position
Not every seating position in every vehicle is suitable for every car seat.
Some vehicles have lower anchors in only certain seating positions. Some center seating positions may not have compatible anchors, and some seats may have restrictions regarding installation.
Safe Kids Worldwide recommends checking the vehicle owner’s manual to determine where a car seat can safely be installed.
How to fix it
Before installation, check:
- Your vehicle owner’s manual
- The car seat manufacturer’s manual
- The available lower anchors
- The available tether anchors
- The approved seat-belt positions
Never assume that because a seating position has a seat belt, it is automatically suitable for every child restraint.
14. Installing the Car Seat on Top of Another Seat Cover or Cushion
Parents sometimes place towels, seat protectors, cushions, or other materials underneath a car seat to protect the vehicle’s upholstery.
The problem is that not every product is compatible with every car seat.
Anything placed between the child restraint and vehicle seat can potentially affect how the restraint sits or how tightly it can be installed.
How to fix it
Use only products specifically permitted by the car seat manufacturer.
If you are unsure whether a seat protector, towel, or other material can be used underneath your car seat, check the manufacturer’s instructions before installing it.
15. Assuming LATCH Is Always Better Than a Seat Belt
LATCH—also called lower anchors and tethers for children—is convenient, but it isn’t automatically a safer installation method for every vehicle, child, or seat.
Both lower-anchor and seat-belt installation can be appropriate when used according to the manufacturer’s instructions. Safe Kids Worldwide specifically notes that both methods can be safe when used correctly.
Another important issue is lower-anchor weight limits.
As your child grows, you may reach the manufacturer’s limit for lower-anchor use. At that point, the car seat may need to be installed using the vehicle’s seat belt instead.
How to fix it
Check the weight limits listed by:
- The car seat manufacturer
- The vehicle manufacturer
If your child and car seat exceed the applicable lower-anchor limit, switch to the installation method specified by the manufacturer.
16. Forgetting to Recheck the Installation as Your Child Grows
A car seat isn’t something you install once and forget about.
Children grow, harness positions change, rear-facing seats eventually become forward-facing, and lower-anchor limits can change as the child gets heavier.
How to fix it
Make a habit of checking the seat whenever:
- Your child gains significant weight or height.
- You change the seat’s direction.
- You adjust the harness height.
- You move the seat to another vehicle.
- You reinstall the seat after cleaning.
- You switch from LATCH/lower anchors to a seat belt.
Regular checks can catch small problems before they become bigger ones.
A Simple Car Seat Installation Safety Check
Before driving, run through this quick checklist:
Installation
☐ Correct seating position
☐ Correct rear-facing or forward-facing configuration
☐ Correct belt path
☐ Correct seat-belt or lower-anchor installation
☐ Lower-anchor limits have not been exceeded
☐ Forward-facing tether attached when required/permitted
☐ Correct rear-facing recline angle
☐ Seat moves no more than about 1 inch at the belt path
Child Fit
☐ Child’s back and bottom are positioned correctly
☐ Harness straps are at the correct height
☐ Harness straps lie flat
☐ Harness is snug
☐ No excess webbing can be pinched at the shoulder
☐ Chest clip is at armpit level
☐ No bulky clothing is underneath the harness
This checklist isn’t a substitute for your specific car seat and vehicle manuals, but it can help you identify common problems before you drive.
What If You’re Still Not Sure Your Car Seat Is Installed Correctly?
Don’t rely on guesswork.
NHTSA recommends having a car seat inspected by a trained Child Passenger Safety Technician if you need help with installation or use. Many inspection stations offer assistance at no cost, and some locations provide virtual inspections.
A certified technician can look at the actual installation and help identify problems that may be difficult to notice from a written guide.
Final Thoughts
The most common car seat installation mistakes aren’t always obvious.
A seat can appear secure while still having the wrong belt path, an incorrect recline angle, a loose harness, an improperly positioned chest clip, or a missing tether.
The best approach is to slow down and check the details every time you install or adjust the seat.
Remember these key rules:
- Read both the car seat and vehicle manuals.
- Use the correct belt path.
- Use either the seat belt or lower anchors unless your manufacturer specifically allows another method.
- Perform the one-inch movement check at the belt path.
- Use the top tether for forward-facing installations when permitted by the car seat and vehicle manufacturers.
- Check the rear-facing recline angle.
- Keep harness straps flat and snug.
- Position the chest clip at armpit level.
- Recheck the installation as your child grows.
If you are still uncertain, getting hands-on help from a certified Child Passenger Safety Technician is one of the best ways to verify your installation.
Continue exploring: browse the full Baby Safety hub.
Frequently Asked
Common Questions