

Installing a car seat is only the first step. The next—and equally important—step is making sure the seat is actually secured correctly.
A car seat can look perfectly installed while still being too loose, attached through the wrong belt path, positioned at the wrong angle, or missing an important component such as the top tether.
So, how can you tell if your car seat is installed correctly?
The simplest check is the Inch Test.
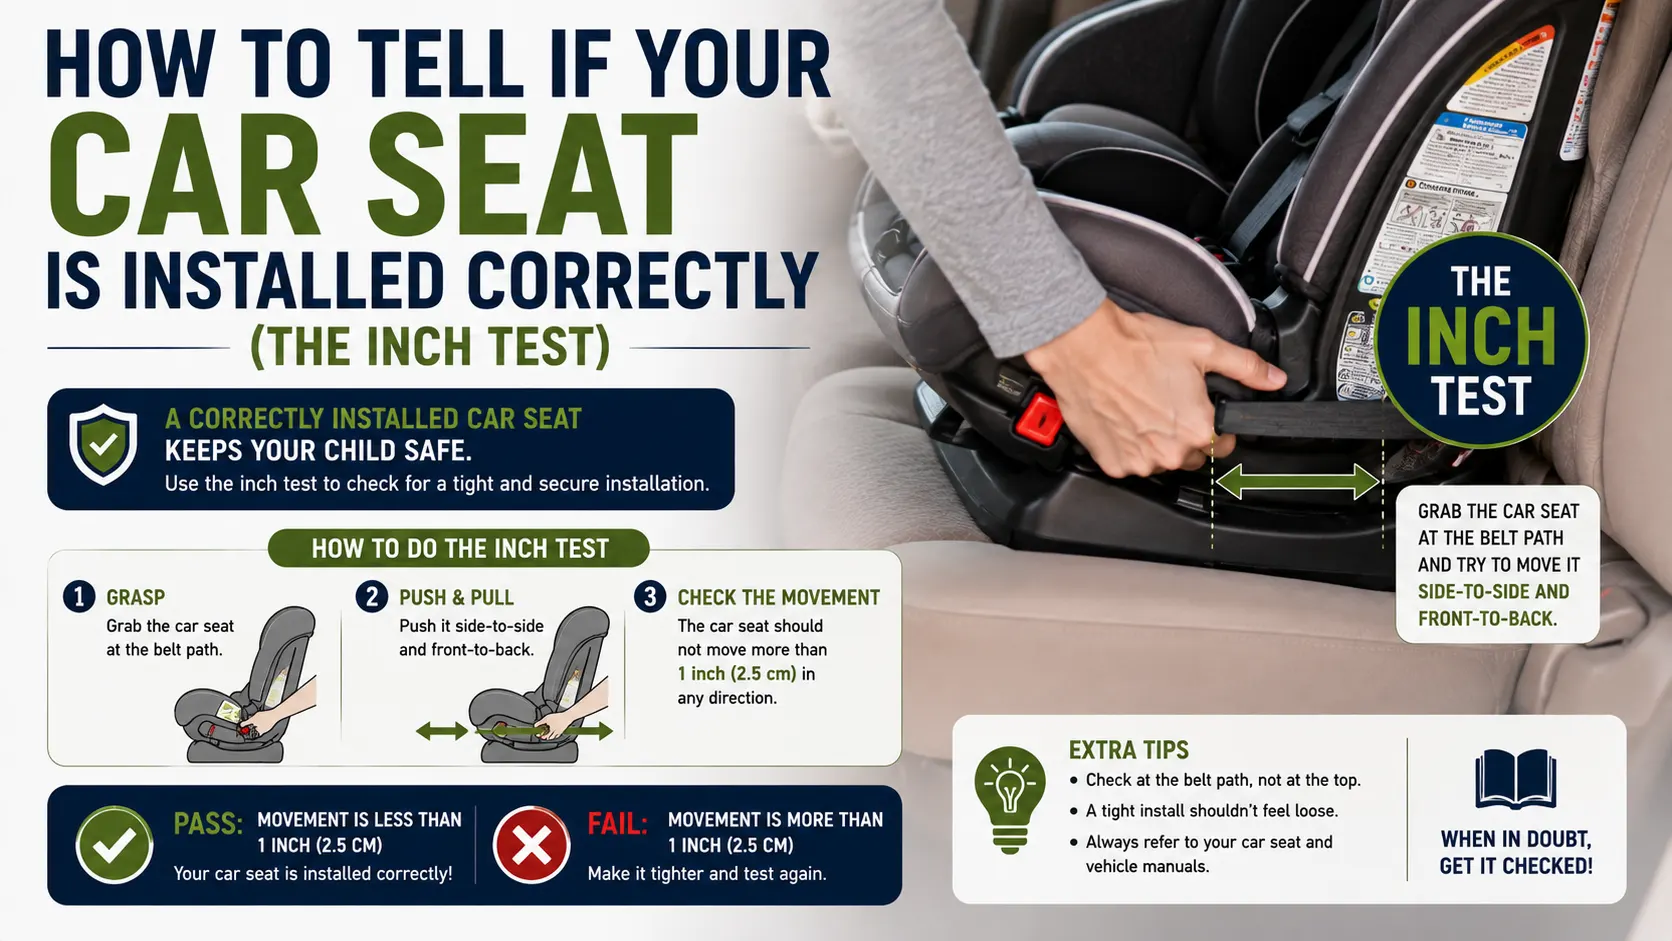
According to the National Highway Traffic Safety Administration (NHTSA), a properly installed car seat should not move more than approximately 1 inch from side to side or front to back when pulled at the belt path.
But the Inch Test is only one part of a complete installation check.
In this guide, we’ll show you exactly how to perform the Inch Test, where to hold the seat, what movement is normal, what to do if the seat moves too much, and what other safety checks you should perform before your child rides.
Important: Always follow the instructions for your specific car seat and vehicle. Installation requirements can vary by model.
Quick Answer: How Do You Know If a Car Seat Is Installed Correctly?
A properly installed car seat should:
- Move no more than about 1 inch side-to-side or front-to-back at the belt path
- Use the correct seat belt path or lower anchors
- Be installed in an approved seating position
- Have the correct rear-facing recline angle when applicable
- Have the top tether properly connected for forward-facing installation when required or permitted
- Follow the manufacturer’s height and weight requirements
- Have a properly fitted harness when your child is seated in it
The most important physical check is the Inch Test: grip the car seat near the belt path and move it side-to-side and front-to-back. If it moves more than approximately one inch, the installation needs to be checked and potentially tightened or reinstalled.
What Is the Car Seat Inch Test?
The Inch Test is a simple way to check whether your car seat is securely attached to your vehicle.
The basic idea is straightforward:
Hold the car seat at the belt path and try to move it. It should not move more than about one inch in either direction.
The test can be used with both:
- Vehicle seat belt installations
- Lower-anchor/LATCH installations
Safe Kids Worldwide specifically recommends the Inch Test for both rear-facing and forward-facing car seats installed with either method.
However, there’s an important detail that many parents miss:
You need to perform the test at the belt path—not at the top of the car seat.
How to Perform the Inch Test Step by Step
Step 1: Make Sure the Car Seat Is Installed
First, install the car seat according to the manufacturer’s instructions.
Depending on the seat and vehicle, this may mean using:
- The vehicle seat belt
- Lower anchors/LATCH
- A seat belt or lower anchors plus the top tether for a forward-facing seat
Do not perform the Inch Test until you’ve completed the installation.
Step 2: Find the Correct Belt Path
The belt path is the part of the car seat through which the vehicle seat belt or lower-anchor attachment secures the restraint to the vehicle.
For a rear-facing seat, it will be the manufacturer’s designated rear-facing installation path.
For a forward-facing seat, it will be the designated forward-facing installation path.
If you aren’t sure where the belt path is, check the car seat’s manual and labels.
NHTSA defines the belt path as the location on the child restraint where the seat belt or lower-anchor attachment is used to secure the car seat.
Step 3: Place Your Hand at the Belt Path
This is the most important part of the test.
Place your hand directly on or immediately next to the car seat’s belt path.
For example, if the seat belt passes through a path near the child’s feet on a rear-facing car seat, that’s the area you should hold.
Don’t grab the headrest, top of the seat, or upper shell.
Safe Kids Worldwide specifically advises checking movement at the belt path rather than at the top of the seat.
Step 4: Move the Seat Side to Side
Using moderate force, move the car seat:
Left → Right
and then:
Right → Left
Watch how much the seat moves at the belt path.
If the movement is approximately one inch or less, the installation passes this part of the check.
Step 5: Move the Seat Front to Back
Now test the second direction:
Forward → Backward
and:
Backward → Forward
Again, hold the seat at the belt path.
The seat should not move more than approximately one inch in either direction.
What Does “1 Inch” Actually Mean?
The one-inch rule does not mean the entire car seat must be completely motionless.
A properly installed car seat can still have some movement.
The important measurement is the movement at the belt path.
Think of it this way:
0–1 inch of movement at the belt path: Generally acceptable according to NHTSA’s installation guidance.
More than 1 inch at the belt path: The installation should be checked and corrected.
The top of a car seat can move more than one inch even when the seat is properly installed. That’s why shaking the headrest or upper portion of the seat is not an accurate way to perform the Inch Test.
Why Does the Top of the Car Seat Move?
This is one of the most common sources of confusion.
A car seat is secured to the vehicle at a specific point—the belt path or lower-anchor attachment.
The upper portion of the seat is farther away from that attachment point.
As a result, the top can have some movement even when the base is securely installed.
This is especially noticeable with rear-facing seats.
So don’t panic if you can move the top of the car seat more than one inch.
The Inch Test is about movement at the installation point.
What If Your Car Seat Moves More Than 1 Inch?
If your car seat moves more than approximately one inch at the belt path, don’t simply assume it’s safe.
Instead, go through the installation again.
Check 1: Is the Correct Belt Path Being Used?
Make sure the seat belt or lower-anchor strap is routed through the correct path for the current configuration.
Convertible car seats can have different belt paths for rear-facing and forward-facing installation.
Check 2: Is the Seat Belt Locked?
If you’re using a vehicle seat belt, make sure it is locked using the method specified by your vehicle or car seat manufacturer.
NHTSA specifically recommends checking your vehicle owner’s manual to understand how the seat belt locks during car seat installation.
Check 3: Is There Slack?
Excess slack in the seat belt or lower-anchor strap can allow the car seat to move.
Press down firmly on the appropriate part of the car seat while tightening the installation according to the manufacturer’s instructions.
Don’t use excessive force or improvise a tightening method that isn’t described in the manual.
Check 4: Is the Car Seat Sitting Correctly?
Make sure the car seat is positioned correctly on the vehicle seat.
For rear-facing seats, also check the manufacturer’s specified recline angle.
NHTSA notes that rear-facing seats should be installed at the correct recline angle, using the seat’s built-in indicator or adjuster when provided.
Check 5: Are You Using the Correct Installation Method?
Remember that a car seat generally uses either the vehicle seat belt or lower anchors to secure it, unless your specific manufacturer instructions permit another configuration.
Don’t automatically combine LATCH and the seat belt because you think using both will make the seat tighter.
Check 6: Is the Seating Position Approved?
Not every position in every vehicle is suitable for every car seat or installation method.
Check your vehicle owner’s manual to confirm that the seating position is approved for the restraint.
The Inch Test for LATCH Installation
The Inch Test works with LATCH/lower-anchor installation too.
After attaching the lower-anchor connectors:
- Check that the connectors are properly attached.
- Make sure the straps aren’t twisted.
- Tighten the straps according to the car seat instructions.
- Hold the seat at the belt path.
- Move it side-to-side.
- Move it front-to-back.
- Confirm that movement is no more than approximately one inch.
Safe Kids Worldwide recommends the same one-inch movement standard for both LATCH and seat belt installations.
Don’t Forget LATCH Weight Limits
Passing the Inch Test doesn’t mean you can use LATCH indefinitely.
Lower-anchor systems have weight limits, and the applicable limit depends on the vehicle and car seat requirements.
As your child grows, you may need to switch from lower anchors to a seat belt even if the car seat still fits your child.
Check the manufacturer’s instructions for the applicable limit.
The Inch Test for Seat Belt Installation
The process is similar when installing with a seat belt.
After routing the vehicle seat belt through the correct belt path:
- Buckle the seat belt.
- Lock it according to the vehicle or car seat instructions.
- Remove slack as directed.
- Hold the car seat at the belt path.
- Test side-to-side movement.
- Test front-to-back movement.
- Confirm that movement is no more than approximately one inch.
NHTSA’s installation instructions use this same movement check for both rear-facing and forward-facing seat belt installations.
Does the Inch Test Apply to Rear-Facing Car Seats?
Yes.
The Inch Test applies to both rear-facing and forward-facing car seats.
For a rear-facing seat:
- Check movement at the belt path.
- Test side-to-side movement.
- Test front-to-back movement.
- Confirm the seat moves no more than approximately one inch.
- Check the correct recline angle separately.
Safe Kids Worldwide specifically recommends performing the Inch Test on rear-facing seats and advises parents to check movement at the belt path near the baby’s feet rather than near the head of the seat.
Does the Inch Test Apply to Forward-Facing Car Seats?
Yes.
For a forward-facing car seat, perform the same movement check at the belt path.
But there is another important component:
Check the Top Tether
Forward-facing car seats may use a top tether attached to the vehicle’s designated tether anchor.
The tether helps limit forward movement during a crash. NHTSA describes proper tether use as an important part of forward-facing installation.
The tether does not replace the primary installation method.
Depending on the manufacturer’s instructions, a forward-facing installation may use:
Seat belt + tether
or:
Lower anchors + tether
Inch Test vs. Harness Pinch Test
These two tests are easy to confuse because they both involve checking whether a car seat is secure.
But they test completely different things.
The Inch Test
Checks whether the car seat is securely attached to the vehicle.
You test:
Car seat → Vehicle
The Pinch Test
Checks whether the harness is snug enough around your child.
You test:
Harness → Child
NHTSA recommends that the harness should be snug enough that you cannot pinch extra material at the child’s shoulder. The chest clip should also be positioned at armpit level.
Both checks matter.
A perfectly installed car seat can still be used incorrectly if the child’s harness is too loose.
The Complete Car Seat Safety Check
Passing the Inch Test is important, but don’t stop there.
Use this five-part inspection before considering the installation complete.
1. Check the Installation
☐ Correct seating position
☐ Correct rear-facing or forward-facing orientation
☐ Correct belt path
☐ Correct seat belt or lower-anchor attachment
☐ No more than approximately 1 inch of movement at the belt path
2. Check the Recline Angle
For rear-facing seats:
☐ Recline indicator is within the manufacturer’s required range
☐ Correct recline position is being used
3. Check the Tether
For forward-facing seats:
☐ Tether is attached when required/permitted
☐ Tether is connected to the vehicle’s designated tether anchor
☐ Tether is tightened according to the manufacturer’s instructions
4. Check the Harness
☐ Harness straps are flat
☐ Straps aren’t twisted
☐ Correct harness slots are being used
☐ Harness is snug
☐ You cannot pinch excess harness webbing at the shoulder
5. Check the Chest Clip
☐ Chest clip is at approximately armpit level
These checks cover both the installation of the restraint and the way your child is secured inside it.
Signs Your Car Seat May Not Be Installed Correctly
Pay extra attention if:
- The seat moves more than one inch at the belt path.
- You can see significant slack in the installation belt or lower-anchor strap.
- The seat belt isn’t locked correctly.
- The wrong belt path is being used.
- The rear-facing angle indicator isn’t within the required range.
- A forward-facing tether is missing when required.
- The lower-anchor weight limit has been exceeded.
- The car seat is installed in a position not approved by the manufacturer.
- You cannot identify how the seat should be installed.
- The seat’s manual and your vehicle manual appear to conflict.
If you encounter any of these problems, stop and review the manufacturer’s instructions before driving.
Does a Car Seat Need to Be Completely Motionless?
No.
This is an important misconception.
A car seat does not need to be completely rigid or frozen in place.
The goal is not zero movement.
The goal is to ensure that the car seat is sufficiently secured at the installation point.
That’s why the accepted check is approximately one inch of movement at the belt path—not zero movement throughout the entire seat.
Should You Perform the Inch Test Every Time You Drive?
You don’t necessarily need to completely reinstall the car seat before every trip.
However, it’s smart to periodically check that the installation remains secure, especially if:
- Someone has moved the seat.
- The seat was removed and reinstalled.
- The car seat was transferred to another vehicle.
- The vehicle seat position was changed.
- Your child has grown significantly.
- You changed the seat’s orientation.
- You switched from LATCH to a seat belt.
- The seat suddenly feels looser than before.
You should also check your child’s harness fit every time they ride.
What If the Car Seat Passes the Inch Test but Still Looks Wrong?
Passing the Inch Test doesn’t automatically mean the entire installation is correct.
For example, a seat could move less than one inch but still have:
- The wrong recline angle
- The wrong belt path
- An incorrectly attached tether
- An inappropriate seating position
- An improperly fitted harness
That’s why the Inch Test should be treated as one important part of the installation check—not the entire check.
NHTSA recommends following the car seat and vehicle manuals for the complete installation process.
What If the Seat Moves More Than One Inch?
Don’t try to solve the problem by simply pushing harder on the seat.
Instead:
- Remove the installation.
- Read the car seat instructions again.
- Check the vehicle owner’s manual.
- Confirm the correct belt path.
- Confirm the correct seating position.
- Reinstall using the approved method.
- Tighten according to the manufacturer’s instructions.
- Perform the Inch Test again.
If the seat still doesn’t pass the test, consider getting professional assistance.
NHTSA notes that trained Child Passenger Safety Technicians can help parents install and use car seats correctly, and many inspection services are free.
Can a Certified Technician Check Your Car Seat?
Yes.
If you aren’t confident about the installation, a certified Child Passenger Safety Technician can inspect the car seat and help you correct installation or harness-fit problems.
This can be especially helpful when:
- The seat won’t tighten properly.
- You have an unusual vehicle seating configuration.
- You’re unsure about LATCH.
- You’re unsure about the seat-belt locking system.
- You recently switched from rear-facing to forward-facing.
- You’re using a new car seat.
- You’re installing a seat in a new vehicle.
NHTSA provides resources for finding car seat inspection stations, and Safe Kids Worldwide also provides information about finding certified technicians and checkup events.
A 60-Second Car Seat Installation Check
If you want a simple routine, use this quick check:
1. Grab
Hold the car seat at the belt path.
2. Shake
Move it side-to-side and front-to-back.
3. Measure
Does it move more than approximately one inch?
Yes → Reinstall and check the instructions.
No → Continue the safety check.
4. Look
Check:
- Recline angle
- Belt path
- Lower anchors
- Tether
- Seat position
5. Fit
Secure your child and check:
- Harness is snug
- Straps are flat
- Correct harness height
- Chest clip at armpit level
This takes less than a minute once you’ve become familiar with the process.
Car Seat Installation Checklist
Before driving, make sure:
☐ The car seat is installed in an approved position.
☐ The correct installation direction is being used.
☐ The correct belt path is being used.
☐ Seat belt or lower anchors are attached correctly.
☐ The seat moves no more than approximately one inch at the belt path.
☐ Rear-facing recline angle is correct.
☐ Forward-facing tether is attached when required/permitted.
☐ The car seat is within its height and weight limits.
☐ Harness straps are flat and untwisted.
☐ Harness is snug.
☐ Chest clip is at armpit level.
☐ Your child is within the manufacturer’s limits for the current configuration.
Final Takeaway
The easiest way to tell whether a car seat is securely installed is to perform the Inch Test.
Hold the seat at the belt path, not at the top, and test it from side to side and front to back.
The seat should not move more than approximately one inch in either direction at that point.
But remember: passing the Inch Test does not automatically confirm that every part of the installation is correct.
A complete safety check should also verify:
- Correct seating position
- Correct belt path
- Proper seat belt or LATCH attachment
- Correct rear-facing recline angle
- Proper tether use for forward-facing seats
- Correct harness height
- Snug harness fit
- Correct chest-clip position
If your car seat still doesn’t feel secure or you’re unsure whether you’ve installed it correctly, don’t guess. Review the manufacturer instructions or have the seat checked by a certified Child Passenger Safety Technician.
A good car seat installation isn’t about making the seat completely motionless. It’s about making sure the restraint is secured correctly where it attaches to the vehicle—and the Inch Test gives you a simple way to check that.
Continue exploring: browse the full Baby Safety hub.
Frequently Asked
Common Questions