
Furniture tip-overs are one of the most serious and most preventable hazards in a home with a mobile baby or toddler, and the fix is a straightforward weekend project. This guide walks through the full process — including two situations most tutorials skip: what to do when a stud doesn’t line up with where you need to anchor, and how to do this safely as a renter who can’t drill into walls freely.
Why This Matters More Than It Might Seem
Furniture and TV tip-overs are a significant cause of injury to young children, largely because furniture with drawers, shelves, or handles gives a climbing toddler exactly the footholds they need to pull themselves up — and once enough weight shifts forward, even furniture that looks stable can come down fast. <cite index=”8-1″>Safety experts note that furniture used to be considered safe from tipping if it was wider than it was tall, but that guidance has changed — every piece should be anchored regardless of its dimensions, since a climbing child can still cause it to tip.</cite> <cite index=”8-1″>Furniture with drawers or shelves is especially important to secure, since these features make climbing easier, and knobs can help a child climb as well.</cite>
Newer dressers sold after late 2023 are built to resist tipping better due to updated safety regulations, but <cite index=”9-2,9-3″>the advice to anchor bookcases, dressers, and TV stands to the wall still applies, especially since so much older furniture on the market doesn’t meet the newer standard.</cite>
What You’ll Need
- A furniture anchor kit (metal strap-and-bracket style, not plastic)
- A stud finder
- A drill and appropriate drill bits
- A pencil for marking
- A tape measure
- Wall anchors rated for your wall type, for situations where a stud isn’t available (see below)
<cite index=”7-1″>Metal anchors, such as L-shaped brackets, are generally recommended over plastic, since plastic can become brittle over time and fail.</cite> <cite index=”7-1″>It’s also worth watching for counterfeit or knockoff anchor products sold online and sticking with known, tested brands even if they cost a little more.</cite>
Step-by-Step: Anchoring Furniture to a Wall Stud (Best Option)
- Find the stud. <cite index=”10-1,10-2″>Use a stud finder, moving it horizontally across the wall until it identifies the edges of a stud — studs are typically spaced about 16 inches apart.</cite> Mark both edges of the stud lightly in pencil so you know its full width, not just one point.
- Position the furniture where you actually want it before marking anything on the furniture itself — moving it later means redoing this step.
- Mark the anchor point on the wall, ideally centered on the stud rather than near its edge, <cite index=”10-1″>since anchoring to the center of a stud provides more stability than anchoring near an edge.</cite>
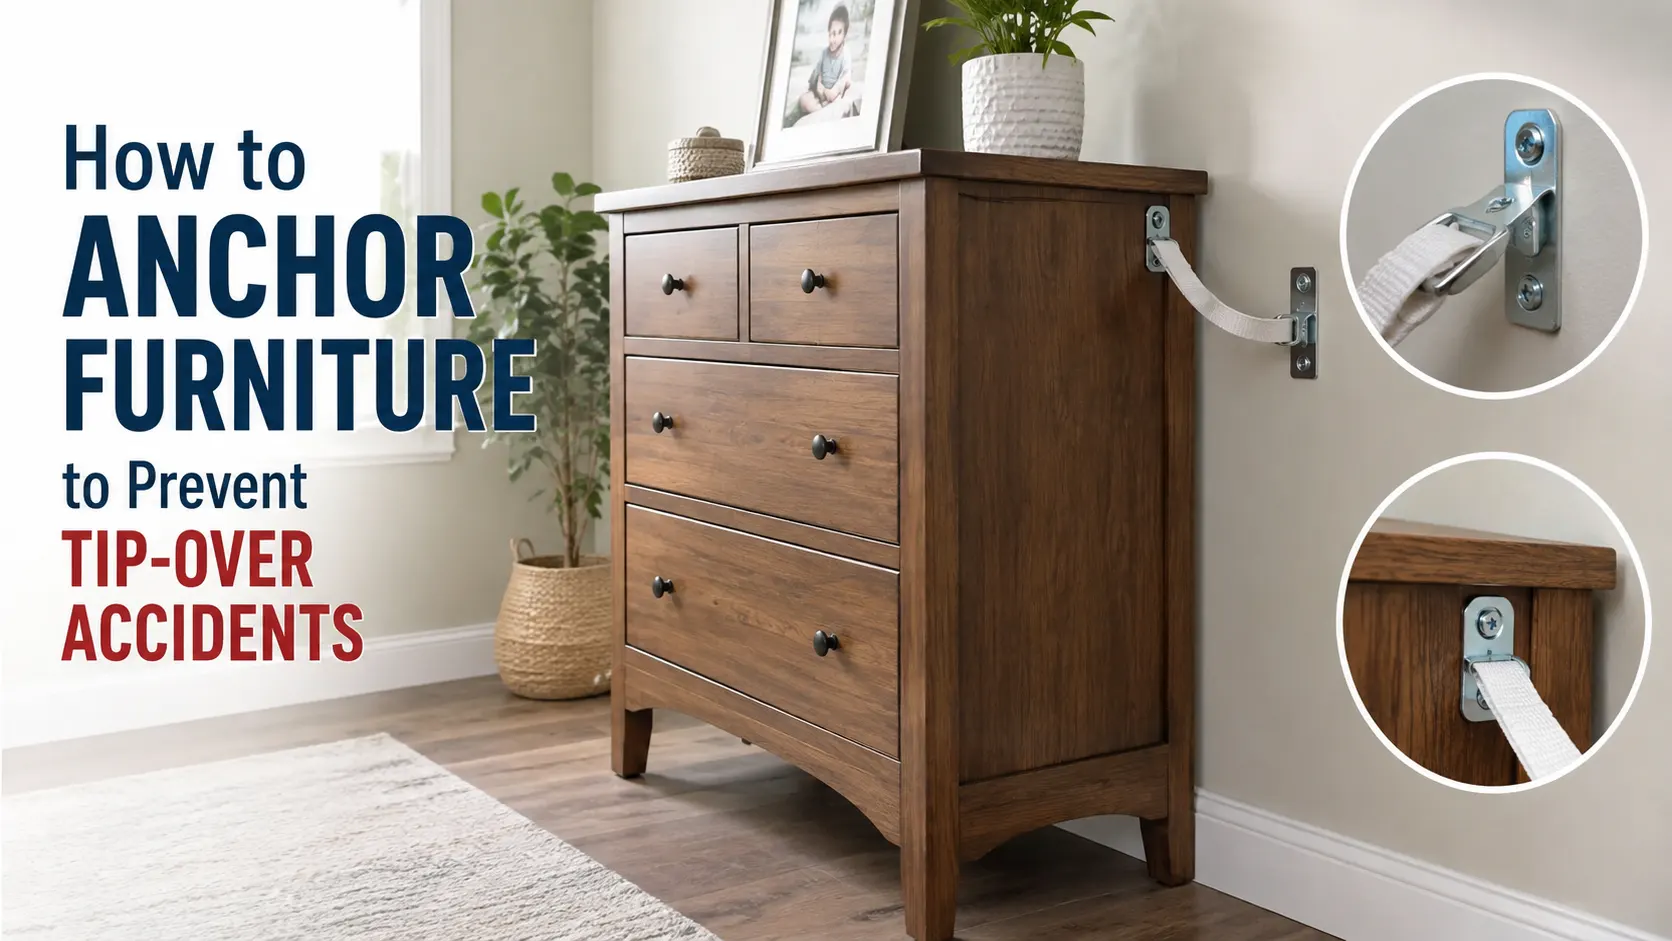
- Attach the furniture-side bracket first. <cite index=”11-1″>Make sure the restraint is installed into a solid part of the furniture — the back panel of many dressers and bookshelves is thin particleboard or veneer, not solid enough to hold weight, so look for a solid rail, the top lip, or a reinforced point instead.</cite>
- Attach the wall-side bracket into the stud, driving screws fully into solid wood rather than just through drywall.
- Connect the strap between the two brackets, and adjust so the furniture sits flush against the wall with the strap under slight tension, not loose.
- Use at least two anchor points per piece of furniture. <cite index=”11-1″>Plan on at least two restraints per piece, and add more for wider furniture, since a single anchor point isn’t enough to prevent tipping under sideways or angled force.</cite>
- Do a strength test. Once installed, apply firm, steady pressure to the top of the furniture the way a climbing toddler might, and confirm it doesn’t shift or pull away from the wall.
What to Do When a Stud Doesn’t Line Up With Your Furniture
This is one of the most common real-world problems, and most tutorials skip it entirely. Studs are fixed in the wall roughly every 16 inches, but your furniture’s ideal anchor point often doesn’t land on one.
- Shift the furniture slightly if there’s any flexibility in its placement, so the anchor point lines up with a stud.
- Use a horizontal mounting rail or plate designed for anchor kits, which spans across the wall and lets you screw into a stud at any point along its length, even if that point isn’t directly behind the furniture’s designated anchor spot.
- Use heavy-duty drywall anchors rated for the expected load (toggle bolts or similar) if no stud is reachable at all — check the weight rating against your furniture’s actual weight, since standard plastic drywall anchors are not rated for this kind of sustained, direction-changing force.
- Avoid relying on adhesive-only anchors as your sole attachment method on drywall without a stud — these are best used as a secondary reinforcement, not the primary hold point.
Anchoring on Non-Drywall Walls (Plaster, Brick, Concrete)
- Plaster walls: studs still exist behind plaster in most homes; a stud finder calibrated for the wall thickness works, but go slowly, since plaster is more prone to cracking around a drilled hole than drywall.
- Brick or concrete walls: use masonry anchors rated for the load, and a masonry drill bit — standard wood screws and drywall anchors won’t hold in these materials.
- Uncertain wall type: if you’re not sure what’s behind the wall, a small test hole in an inconspicuous spot (like inside a closet) can confirm the material before you commit to a visible anchor point.
Anchoring as a Renter
- Ask first — many leases allow small, patchable holes for safety equipment like furniture anchors, even when larger modifications aren’t permitted; landlords are often willing to make an exception for child safety.
- Use furniture-to-furniture anchoring where possible — securing a bookshelf to an adjacent, heavier piece of furniture (rather than the wall) can reduce tip risk in situations where wall drilling isn’t an option, though it’s a secondary solution, not as reliable as a wall stud anchor.
- Choose furniture placement strategically — positioning tall, climbable furniture in a corner (anchored to two walls if possible) or away from areas your baby spends unsupervised time reduces risk even before any hardware goes in.
- Patch and touch up on move-out — anchor screw holes are small and easy to fill with spackle, generally a minor and low-cost fix compared to the safety benefit.
Special Cases
Stacked Furniture (a Hutch on Top of a Dresser, or a Bookshelf Topper)
<cite index=”11-1″>Anchor the top piece to the base piece first, and then anchor the base piece to the wall</cite> — a stacked piece anchored only to the wall, with nothing securing it to the furniture below it, can still slide or tip independently.
TVs
Mount flat-screen TVs directly to the wall when possible, or use an anti-tip strap or bracket kit designed specifically for TVs if wall-mounting isn’t an option — a flat-screen TV is lighter than older models but still substantial enough to cause serious injury if pulled down.
Wide or Extra-Heavy Furniture
Use more than the standard two anchor points — a wide dresser or a heavily-loaded bookshelf needs anchors distributed across its width, not just at one central point, to resist tipping from any angle a child might pull from.
Common Mistakes to Avoid
- Using the plastic straps or cable ties furniture sometimes ships with. These are frequently not rated for the sustained, repeated force of a climbing child and are one of the most common anchor failure points.
- Anchoring into the furniture’s thin back panel instead of a solid rail or structural point — the anchor can pull straight through particleboard under real force.
- Using only one anchor point on furniture that’s wide or heavy.
- Never re-checking anchors after installation. <cite index=”10-3″>Anchoring hardware should be periodically checked for wear or damage, and furniture should occasionally be gently pulled on to confirm it remains firmly secured.</cite>
- Assuming a heavier piece of furniture doesn’t need anchoring. Weight alone doesn’t prevent tipping — a determined, climbing toddler can shift even substantial furniture enough to cause it to fall.
Maintenance: How Often to Re-Check Anchors
- Every 3–6 months, do a firm strength-test pull on each anchored piece.
- After any furniture rearrangement, re-anchor before your baby has access to the room again — moving furniture even slightly can compromise a previously solid anchor point.
- After any home renovation or wall work near an anchored piece, confirm the anchor point wasn’t disturbed.
- Immediately if you notice any visible wear, looseness, or damage to straps, brackets, or screws — don’t wait for the next scheduled check.
The Bottom Line
Anchoring furniture properly comes down to a few non-negotiables: metal hardware over plastic, anchoring into solid wood on both the furniture and the wall (a stud whenever possible), at least two anchor points per piece, and a recurring strength-test check rather than a one-time install-and-forget approach. When a stud doesn’t line up or drilling isn’t an option, there are still solid alternatives — the goal is making sure every anchor point actually holds under real force, not just installing something that looks secure.
Continue exploring: browse the full Baby Safety hub.
Frequently Asked
Common Questions